
Mooncell AutoLED Software Guide: Full Setup & Configuration (2026)
Mooncell AutoLED software is the single configuration tool behind every Mooncell controller — the processors, sending controllers, receiving cards, creative controllers and the V Series splicer all commission in the same free program, which is what makes the family feel like one system rather than a parts list. This guide covers installation, the five-step wall workflow, irregular-screen configuration, firmware and recovery, and the monitoring tools that keep a Mooncell wall healthy — with the cross-brand software comparison that explains why AutoLED is one tool, not one per device.
Short answer: Mooncell AutoLED is the free, unified configuration software for the whole Mooncell LED control ecosystem: one installer configures the MVB and M40 processors, the MTB sending controllers, the A712 and A10X receiving cards, the B1200S and MB400S creative controllers, and the V Series splicer. The core workflow is five steps — connect over USB or LAN, map the wall with network-port debugging, configure the modules, apply correction and grayscale, and read the configuration back for backup. LEDmagic handles the players’ content side and M3 Studio runs the splicer, all free from Mooncell’s download center.
The version history is short and worth knowing: AutoLED tracks the hardware sheets the family publishes — the A712 V4.0 and A10X V4.0 releases, the MTB V4.0 series and the V Series V4.1 update moved together with software revisions that added the features the sheets document, such as Seam Tool handling and the splicer’s automatic data recovery. When a product page quotes a specification version, the matching AutoLED revision is the one to run; the download center lists them together, which is the safe pairing rule for any fleet.
What Is Mooncell AutoLED Software?
Mooncell AutoLED is a synchronous LED display configuration tool: it connects to Mooncell controllers over USB or the network, builds the wall’s canvas and module map, applies correction and grayscale settings, and manages firmware and monitoring — all in one program. It is the Mooncell answer to the “one brand, one tool” discipline that keeps a control ecosystem serviceable: an integrator who commissions an MVB12E processor carries the same workflow to the A712 receiving cards in the cabinets and the V Series splicer at the head end.
Around AutoLED sit two companion tools: LEDmagic manages the asynchronous players (the MB401 and MP series) with mobile and cloud publishing, and M3 Studio runs the V Series splicer’s scene and layer workflows. All three are free from Mooncell’s official download center — the same no-license model NovaLCT and LEDVISION follow. Download discipline matters: only the official center, because third-party bundles often package outdated versions that cause exactly the detection failures the troubleshooting guide covers.
The scope of AutoLED is worth stating precisely: it configures the synchronous tier end to end — the MTB400E and MTB2000E sending controllers, the MVB20E-G and M40 processors, the A10X and A712 receiving cards, and the creative and splicer tiers. A commissioning pass on a 4K wall touches one MVB12E and 26–32 A712 cards; on a command center it touches a V Series chassis and hundreds of cards — the same tool, the same steps, a different canvas size. The readback discipline that starts in step five of every pass is what makes the fleet serviceable by one team.
How Do You Install and Set Up AutoLED?
Installation is a three-step job, and most setup friction comes from the connection, not the installer:
- Download from the official center. Mooncell’s download page carries AutoLED, LEDmagic and M3 Studio plus the current driver — install the driver first on Windows.
- Connect the controller. The MTB sending controllers and the MVB/M40 processors connect over USB; the players expose a CONFIG port; the receiving cards are reached through the sending stage’s network. The USB indicator on the sending panels confirms the link before software is opened.
- Match versions. AutoLED, the driver and the controller firmware should move together — when a detection fails, upgrade the controller firmware through AutoLED first, then retry.
The connection steps and driver details live in the LED sending card configuration guide; this page assumes the controller is on the desk and AutoLED sees it.
A worked example of the five steps on a real project: an integrator commissioning a 3,840 × 2,160 4K wall with an MVB12E and 32 A712 cards starts with the network-port debugging pass — the cards print their positions on the target boxes while the wall is still being wired, so a swapped cabinet row is caught before power is up. The canvas is set to 4K, the module editor maps the cabinet topology, correction runs at the A712’s chromaticity-corrected load, and the readback file is saved before the wall goes live. Three months later a card fails; the spare from the same batch inherits the readback and the wall is back in minutes — the full loop that this guide’s five steps make routine.
A10X in AutoLED — the five-step workflow ends with a saved readback.
How Do You Configure a Mooncell Wall with AutoLED?
The wall configuration is a five-step workflow that is identical across the family — only the canvas size and the receiving-card count change:
The full commissioning sequence — wiring, network mapping, module configuration, correction — is documented step by step in the LED display configuration and system debugging guide, and the module editor doubles as the maintenance surface for the signal chain checks that follow a swap.
Correction depth is set in step four, and the grayscale choice follows the card: the A10X enables 22-bit grayscale — multiplying the screen’s gray steps by 64 — while the A712 enables 18-bit and adds the Seam Tool for splice bright/dark lines, both adjusted live in the software. Pixel-level brightness and chromaticity correction run through the Mooncell calibration tooling, and RGB-independent Gamma handles per-channel drift. The correction loads matter: the A712’s chromaticity-correction band is 256×320 and the A10X’s is 512×512, so a factory-calibrated wall should be configured on the corrected figure rather than the raw maximum — the detail that keeps a calibration pass from failing at the last cabinet.
B1200S in AutoLED — the irregular-screen workflow.
How Do You Use AutoLED for Irregular and Creative Screens?
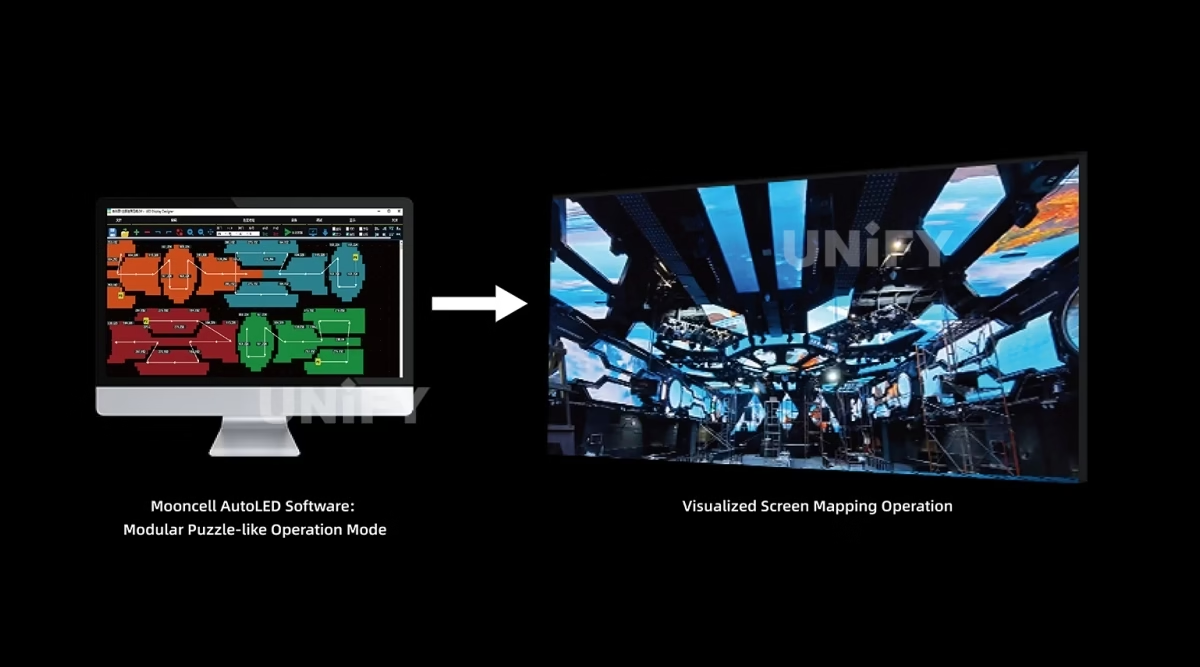
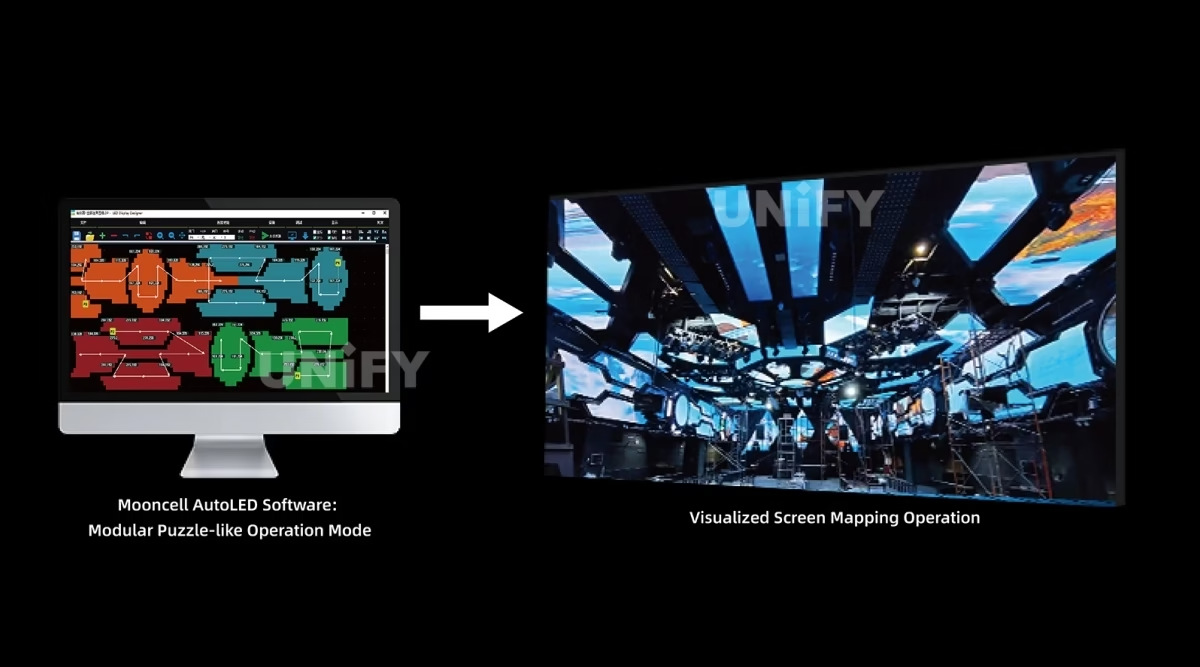
The irregular-screen workflow is where AutoLED separates Mooncell from the other control ecosystems: the same module editor that maps rectangular cabinets handles spheres, rings, domes and floor screens. The B1200S creative controller’s arbitrary pixel mapping is configured here — module count, arrangement pattern and pixel coordinates, with module cropping for the edge pixels a sphere’s pole regions create — and Mooncell documents the geometry work in official video tutorials, including a 13-minute triangle-module mapping walkthrough and an irregular-screen debugging guide. The MB400S player tier carries the same geometry into its playback configuration, so a creative wall commissions on one software surface from pixel map to content schedule.
The irregular workflow also covers the Seam Tool’s creative cousin: smart resolution settings let different network ports carry different resolutions, which is how a mixed-pitch creative wall — a P2.5 zone beside a P4 zone on one controller — stays within the per-port loading math. The B1200S page documents the 7680×4096 sphere loading limit and the F5 height rule that bound the canvas before the mapping pass starts; the V Series carries the same flexible-loading idea to a 200-port chassis. Geometry first, mapping second, correction third — the order never changes.
How Do You Upgrade Firmware and Recover Configuration in AutoLED?
Firmware and recovery run through AutoLED with a safety net at the hardware level:
- Online upgrade. The receiving cards and sending controllers upgrade through AutoLED — pull cloud resources or import upgrade files. The FPGA dual-program startup on the receiving cards means an interrupted upgrade boots a standby program instead of a dead card.
- Same-batch discipline. Keep the fleet on one firmware revision per site and keep the older revision’s files on record — the silent cause of “it worked yesterday” is a mixed-revision fleet.
- Recovery by readback. When a card is replaced, the saved configuration readback restores the wall’s settings in minutes — the workflow behind every field swap in the Mooncell LED controller troubleshooting guide.
The recovery path has three layers, and AutoLED sits at the center of all three. At the card level, the FPGA dual-program startup boots a standby program when a main-program configuration fails — the hardware safety net that makes the online upgrade path safe. At the software level, configuration readback restores a replacement card in minutes; at the fleet level, the saved readback files are the rollback artifacts for any firmware regression. The V Series adds automatic data recovery from internal flash, so a swapped splicer chassis inherits the wall’s configuration without a re-commission pass. Combined with the MTB sending controllers’ EDID management and preset resolutions, the recovery story is the quiet reason Mooncell walls come back fast — the redundancy and backup guide covers the system-level version of the same discipline.
What Do AutoLED’s Monitoring Tools Report?
The monitoring layer turns AutoLED from a configuration tool into the wall’s health dashboard:
The monitoring tools pair with the hardware LEDs documented on the product pages — a reading in AutoLED and a reading on the panel tell the same story, and the LED display troubleshooting guide bridges the two when they disagree.
The monitoring reports translate into maintenance budgets: cable-quality readings flag a marginal run before it becomes a night call, serial-number detection turns a hundred-card fault hunt into a walk with a flashlight, and the host-software status on the sending and splicer tiers gives the operations desk a live picture without leaving the room. On a rental fleet, those readings schedule cable replacement between shows instead of during one; on a fixed wall, they are the early warning that a link is aging. The LED screen for events and LED display warranty guides frame the operational and contractual sides of the same picture.
Practical differences surface in daily use. AutoLED’s irregular-screen editor accepts a sphere’s module arrangement as a first-class configuration rather than a series of workarounds; its serial-number detection prints the card map on the wall itself; and its readback workflow is the documented path for every spare-card swap in the family’s service guides. NovaLCT’s advantage is ubiquity — a technician who has configured any LED wall in the world has touched it — and LEDVISION’s C-Cloud is the most turnkey for signage fleets. For teams standardizing on Mooncell hardware, AutoLED removes the second tool from the truck, which is the practical meaning of “one brand, one tool.”
How Does AutoLED Compare with NovaLCT and LEDVISION?
The software comparison is short because the discipline is shared: each control ecosystem ships one configuration tool per family. Mooncell’s AutoLED covers the synchronous tier from the MVB processors to the V Series splicer; Novastar’s NovaLCT covers the MCTRL/VX/A-series; Colorlight’s LEDVISION covers the X/i-series. The differences are scope and the creative workflow: AutoLED’s irregular-screen editor and its free companion tools (LEDmagic for players, M3 Studio for the splicer) mean a Mooncell integrator holds one software surface for every tier the brand makes — the practical argument documented on the Mooncell vs Colorlight vs Novastar guide, which compares the three ecosystems tier by tier. Software familiarity is a legitimate tiebreaker when hardware tiers match.
Two transition notes for teams switching to Mooncell. First, the learning curve: an integrator fluent in NovaLCT or LEDVISION carries most of the vocabulary — canvas, module map, scan mode, correction — into AutoLED; the new surface is the irregular workflow and the readback habit. Second, the hardware lock: AutoLED only drives Mooncell controllers, so the software decision was made when the hardware was chosen — the closed-ecosystem rule documented on the Mooncell vs Colorlight vs Novastar guide applies to software as firmly as to cards. Budget the first project’s commissioning time with one experienced hand on the tool, and the second project runs itself.
What Do Buyers Ask About Mooncell AutoLED Software?
The installation profile determines how much of AutoLED you use daily. A signage integrator lives in the module editor and LEDmagic, deploying content to MB401 players across a cluster; a rental house lives in the five-step workflow and the monitoring tools, re-rigging MVB processors weekly; a command-center team lives in the splicer scenes and the status views. All three operate the same tool, which is the family’s quiet efficiency argument: training transfers, spares transfer, and the readback discipline transfers from the smallest single-card repair to the largest chassis swap. The how to choose a Mooncell LED control system guide explains which tier each profile should buy; this guide explains how it will run them.
Conclusion: Why AutoLED Is the One Tool Behind the Mooncell Family
Mooncell AutoLED software is the thread that ties the family together: one installer, five workflow steps, and every tier from the MVB4S Pro at $198 to the V1400 splicer at 130M commissions on the same surface. The readback habit turns every future field swap into minutes; the monitoring layer turns the software into the wall’s health dashboard; and the irregular-screen workflow covers the geometry the other ecosystems route around. For the integrator, AutoLED is the argument that Mooncell is one system, not a parts list — and it is free, which makes the decision easier than the hardware one. Every page in the Mooncell family links back to this guide, and every commissioning session should start with it.
Buying Mooncell control hardware and want the configuration handled properly? Talk to us — we are the LED screen manufacturer behind unifyled.com, and every system we ship is configured, tested and warrantied inside the display.