
How to Make an LED Screen: DIY, Modular Build, and Factory Manufacturing (2026)
An LED screen is a grid of light-emitting diodes addressed by a controller, built either as a small DIY matrix or as a modular commercial display. The phrase covers three very different projects: a desktop matrix that costs $30, a P10 wall that costs $20,000, and a factory run that produces hundreds of cabinets. This guide separates the three paths, gives the module math and power numbers, and shows where DIY stops.
Short answer: To make an LED screen, choose the path that matches the size and life you need. A small decorative screen can be built at home with WS2812B strips or HUB75 modules, an ESP32 controller, a 5V power supply, and a frame. A commercial wall is built from P10 or fine-pitch modules, receiving cards, cabinets, and a sending controller, then configured in software such as NovaLCT. A factory-made screen adds SMT assembly, LED binning, aging tests, and calibration. DIY works for learning and art; modular and factory builds are the only practical routes for a daylight-readable, weather-rated, serviceable display.
1. How to Make an LED Screen: The Direct Answer
An LED screen is a display in which each pixel is a light-emitting diode or a small cluster of diodes, switched by driver ICs and fed by a controller. The pixels sit on a module, the modules sit in a cabinet or frame, and the controller receives video or data and maps it to the pixels. That architecture is the same whether the screen is 30 cm wide or 30 m wide; the scale changes the parts, not the principle. For a deeper explanation of the driver and scan path, see how an LED display works.
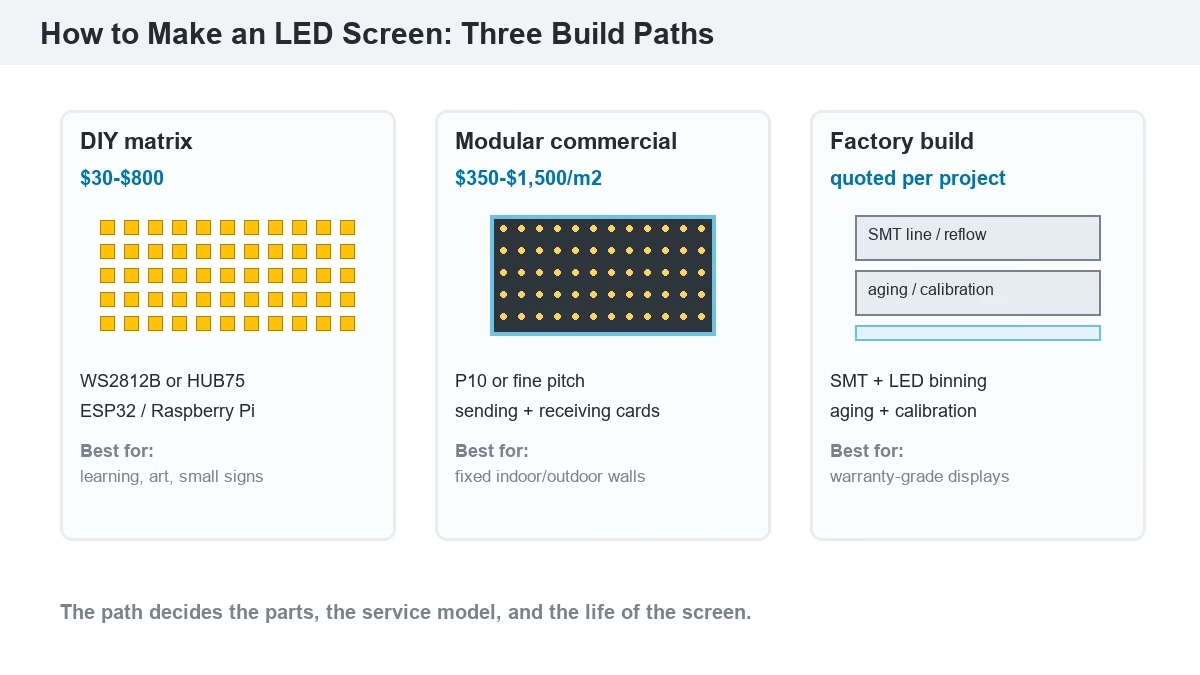
There are three ways to make one:
- DIY matrix: WS2812B strips or HUB75/P10 modules, an ESP32 or Raspberry Pi, a 5V power supply, and a frame. Best for learning, art, and small signs; cost starts around $30.
- Modular commercial build: P10 or fine-pitch modules, receiving cards, power supplies, a sending card, and cabinets. Best for a permanent indoor or outdoor wall.
- Factory manufacturing: LED binning, SMT, reflow, module and cabinet assembly, aging, calibration, and test. This is how a screen with uniform brightness, IP65 sealing, and a warranty is made.
The decision rule: daylight, weather, or unattended operation calls for the modular or factory path; a decorative build in a controlled room can be DIY.
2. What Does It Mean to Make an LED Screen? Three Build Paths
A DIY LED screen is a screen assembled from hobby modules or strips, with a microcontroller as the controller and a handmade frame. A modular LED screen is a screen assembled from commercial LED modules and cabinets, with a sending card, receiving cards, and a video processor. Factory LED screen manufacturing is the industrial process that turns LEDs, driver ICs, PCBs, and mechanical parts into those modules and cabinets at a consistent quality level.
| Path | Typical size | Tools | Cost band | Best use |
| DIY matrix | 0.2–2 m wide | Soldering iron, frame, ESP32, 5V PSU | $30–$800 | Learning, art, streaming, small signs |
| Modular commercial | 2–30 m wide | Module tools, sending card, receiving cards, software | $350–$1,500/m² | Fixed indoor/outdoor walls, churches, retail |
| Factory manufacturing | Any size, volume order | SMT line, reflow, AOI, aging racks, calibration | Quoted per project | Projects needing warranty and spares |
Four key differences separate the paths:
- DIY screens are pixel-count limited. A microcontroller drives thousands of pixels, not hundreds of thousands, and the refresh rate drops as the count rises.
- Modular screens are serviceable. A failed module or receiving card can be replaced; a sealed DIY strip means rebuilding the section.
- Factory screens are calibrated. LED binning and cabinet calibration keep brightness and color consistent.
- Only modular and factory builds scale outdoors. IP65 sealing, UV-rated masks, and waterproof connectors are engineered parts.
3. How Do You Make an LED Screen at Home? DIY Step by Step
A DIY LED screen is a practical first project if you keep the pixel count and power draw inside the controller’s limits. Two approaches cover most builds: addressable WS2812B strips for decorative walls, and HUB75 or P10 modules for text and simple images.
| Build | Parts | Typical cost | Source |
| 8×8 WS2812B matrix | 64 LEDs, 64 × 100nF capacitors, PCB, ESP32 | About $30 | JLCPCB 2026 |
| 32×32 matrix | 1,024 LEDs, 5V 60A PSU, power injection | $150–$300 | LED Matrix project data |
| 64×64 matrix | 4,096 LEDs, larger PSU, frame, diffusion | $400–$800 | LED Matrix project data |
| 7 ft decorative wall | 16 × 5 m WS2812B 30P/m, ESP8266, 4 × 5V 60A PSU | Under $500 | Kinglight 2024, citing Tech Random |
The build sequence for a home screen is:
- Define the canvas. Decide width, height, pixel pitch, and viewing distance.
- Choose the module type. WS2812B strips for a decorative wall; HUB75 or P10 modules for text and video.
- Build a rigid frame. Wood, aluminum extrusion, or 3D-printed grid. Keep the module faces in one plane.
- Mount the LEDs or modules. Run strips in a serpentine path; connect P10 HUB ribbons in the correct order.
- Wire power and data. Use a separate 5V supply, connect grounds, and inject power every few rows.
- Configure and test. Load WLED or FastLED, set the matrix layout, run an all-white test, then a color test.
How Many LEDs Do You Need to Make an LED Screen?
The LED count is width in pixels multiplied by height in pixels. A 32×32 matrix has 1,024 LEDs; a 64×64 matrix has 4,096. For a wall, calculate pixels from size and pitch: a 3.2 m wide screen at P10 has 320 pixels across and 192 pixels high. A typical WS2812B draws about 60 mA at full white, so 1,024 LEDs can pull 61 A at 5V (LED Matrix project data).
Which Controller Should You Use to Make an LED Screen?
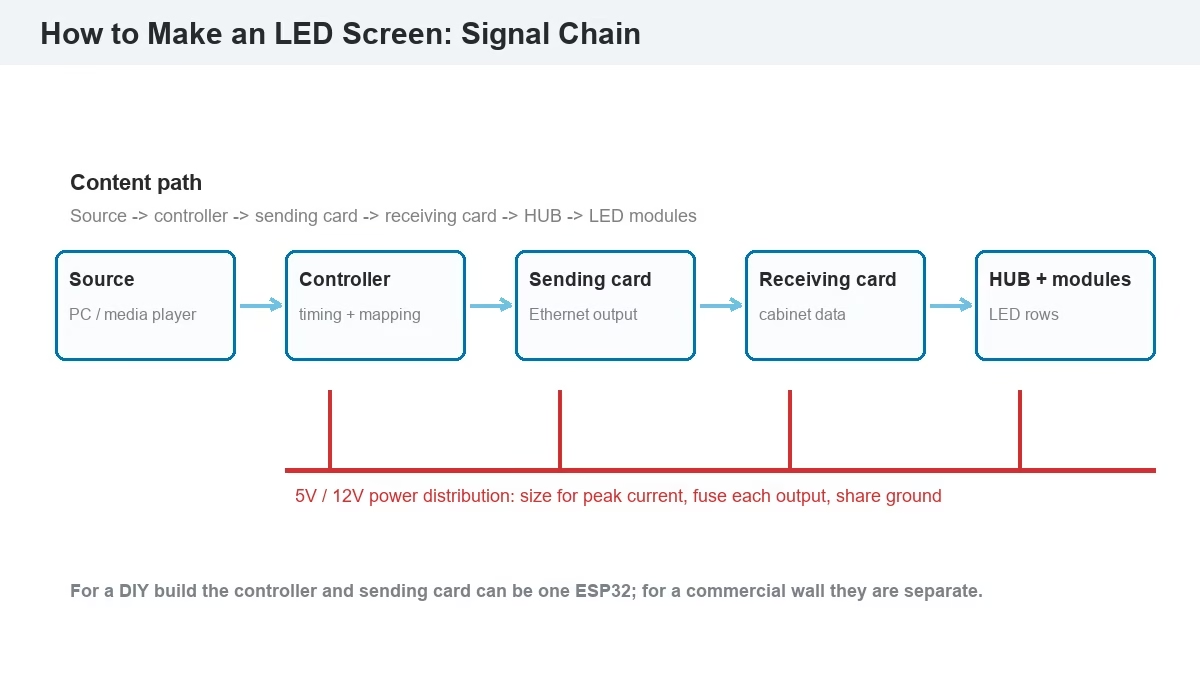
A controller is the board that receives content and sends pixel data to the screen. For DIY builds, an ESP32 running WLED or FastLED handles WS2812B strips and small HUB75 panels; a Raspberry Pi suits image and video playback. For commercial builds, a sending card or video processor (Novastar, Colorlight, Huidu) feeds receiving cards over Ethernet. Match the controller to the pixel count first, then to the content type.
How Do You Power a DIY LED Screen?
A DIY LED power system is a 5V or 12V supply, a distribution bus, and enough injection points to keep voltage from sagging at the far end of the strip. A 32×32 WS2812B matrix at full white can draw about 307 W, or 61 A at 5V, so the supply needs to be rated above that peak (LED Matrix project data). Use a 5V 60A or larger supply, 16–18 AWG wire for the main runs, fuses on each output, and a common ground between the controller and the supply.
4. How Do You Make an LED Screen From P10 Modules and Cabinets?
A P10 LED screen is a modular display built from 10 mm pitch LED modules, usually 320×160 mm with 32×16 pixels, mounted in cabinets. The module itself is a standard part; see the P10 LED module for the unit that sets the pixel grid. It is the lowest-cost outdoor pitch and the most common first commercial build. The design work is module math, receiver capacity, power, and frame layout.
Take an 8 m × 6 m wall as a worked example. A 160×160 mm module with 16×16 pixels gives 48 modules across and 36 high, or 1,728 modules. The screen area is 44.24 m², the resolution is 768×576 pixels, and the wall needs at least 14 receiving cards at 256×128 pixels per card. About 40A per square meter at 5V (200 W/m²) is a common planning figure for P10, so size the supply for peak, not average.
How Much Power Does a Modular LED Screen Draw?
A modular LED screen draws power by module, not by a single label. The UnifyLED 2026 P10 price guide uses 120–200 W/m² for mixed content and 250–350 W/m² at peak. A 44.24 m² wall therefore needs roughly 5.3–8.8 kW mixed and 11–15.5 kW at peak, before supply losses. Size the AC feed and breakers for peak, and use the supplier’s cabinet data sheet for the final number. The LED screen calculator covers size, resolution, power, and budget.
5. How Does a Factory Make an LED Screen?
Factory LED screen manufacturing is a controlled process that turns LEDs, driver ICs, PCBs, and mechanical parts into matched modules and cabinets. The LED display factory page shows the production environment behind this process. The steps are LED binning, SMT placement, reflow soldering, AOI inspection, module assembly, cabinet assembly, aging, calibration, and final test.
- LED binning. LEDs are sorted by wavelength and brightness so one module does not show color patches.
- SMT and reflow. Driver ICs and LEDs are placed on the PCB and soldered in a reflow oven.
- AOI and electrical test. Automated optical inspection catches missing, shifted, or bridged parts.
- Module assembly. The PCB, mask, and frame become a module, then it is tested for dead pixels and brightness.
- Cabinet assembly. Modules, receiving cards, power supplies, and connectors go into the cabinet; flatness and sealing are checked.
- Aging and calibration. The cabinet runs for hours, then brightness and color are set to the batch standard.
- Final test and packing. A full-screen test pattern, packing, and spare-parts kit close the order.
Why Does LED Binning Matter When Making an LED Screen?
LED binning is the sorting of LEDs by brightness and color before assembly. Two LEDs from different bins can look identical in a tray and visibly different on a wall. Binning keeps each module within a tight range, which is why a factory wall looks uniform. It also matters for spares: a replacement from a different bin will stand out.
The video below shows module installation inside a real factory. The next video shows the five-step cabinet assembly that turns modules into a wall.
6. How Much Does It Cost to Make an LED Screen in 2026?
A DIY LED screen cost is driven by pixel count and power; a commercial LED screen cost is driven by area, pixel pitch, brightness, control hardware, and installation.
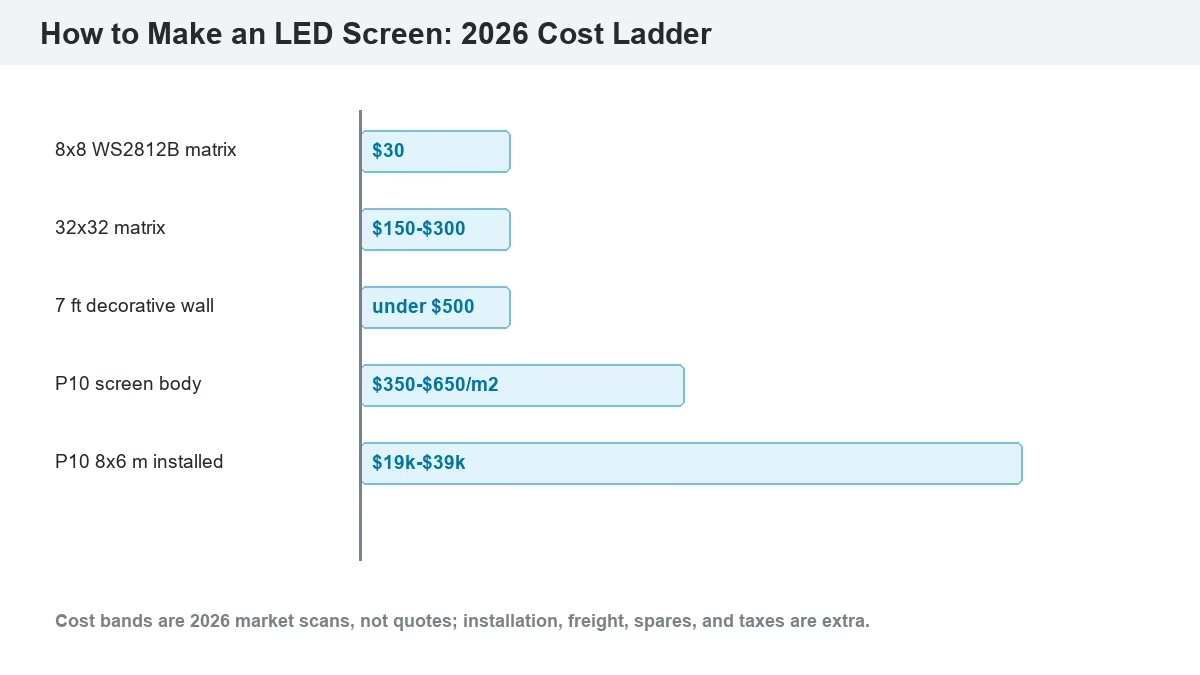
| Build | 2026 cost | What is included |
| 8×8 WS2812B matrix | About $30 | PCB, LEDs, capacitors, ESP32; frame extra |
| 32×32 matrix | $150–$300 | LEDs, controller, PSU, frame, diffusion |
| 7 ft decorative wall | Under $500 | Strips, controller, 4 PSUs, 3D-printed grid, diffusion |
| P10 8×6 m installed | $19,000–$39,000 | Screen, structure, installation, control, before freight and taxes |
The 8×6 m total uses the UnifyLED 2026 P10 price band: 44.24 m² at $350–$650/m² is $15,500–$28,800 for the screen, a 20–30% adder is $3,100–$8,600 for structure and installation, and control hardware is $500–$2,000. Freight, spares, and taxes are extra.
Is It Cheaper to Make an LED Screen or Buy One?
For a small decorative screen, DIY is cheaper than buying a commercial panel. For a wall that must run daily, DIY is usually more expensive once you count time, tools, failed parts, and the lack of a warranty. A 32×32 DIY matrix costs $150–$300 in parts, but a commercial-grade P10 wall costs $350–$650/m² because the price includes binning, sealing, calibration, and service. The break-even point is not the bill of materials; it is the first failure you cannot fix without rebuilding a section.
7. Which Software and Controller Do You Need to Make an LED Screen Work?
A screen controller is the hardware that receives content and sends it to the LED drivers; the software is what maps the screen and publishes the content. DIY builds use WLED, FastLED, or a Raspberry Pi player; commercial builds use NovaLCT, LEDVISION, or HDPlayer with a sending card and receiving cards. For hardware options, see the Novastar LED display controller and Colorlight LED controller catalogs.
| Path | Controller | Software | Best use |
| DIY addressable | ESP32 / ESP8266 | WLED, FastLED | Strips, matrices, art |
| DIY HUB75 | ESP32 / Raspberry Pi | ESPHome, PlatformIO, rpi-rgb-led-matrix | P10/HUB75 text and images |
| Commercial Novastar | MCTRL sending card + receiving cards | NovaLCT | Fixed walls, video processors |
| Commercial Colorlight | X series controller + receiving cards | LEDVISION | Rental and fixed walls |
What Is the Difference Between a Sending Card and a Receiving Card on an LED Screen?
A sending card is the controller-side board that takes video from a PC or processor and sends it over Ethernet; a receiving card is the cabinet-side board that receives that data and drives the module rows. The sending card sets the total pixel capacity and the number of ports. The receiving card sets the pixels per cabinet and the scan mode. Both must be compatible with the module’s driver ICs and the software version. For commercial control options, see the LED screen display control system guide.
8. How Do You Wire and Power an LED Screen Safely?
A safe LED screen wiring plan starts with peak current, not average current. The LED display power supply catalog lists the 5V supplies used in commercial cabinets. Add up the module ratings, add 20–30% headroom, choose cable gauges for the run length, and fuse each supply output. Keep AC and DC separated, ground the frame, and use waterproof connectors outdoors.
- Calculate peak power. Use the module data sheet, not the label on a cheap supply.
- Inject power at both ends of long runs. Voltage drop shows as dim red sections at the far end.
- Connect grounds. The controller and the LED supply must share a ground.
- Fuse each output. A short on a 60A supply can weld a connector.
- Keep data and power apart. Run data cable away from AC mains.
- Seal outdoor connections. Use IP68 glands and add a drip loop at the cabinet entry.
Why Does a DIY LED Screen Flicker or Fail?
A flickering DIY LED screen usually has one of four causes: voltage drop at the end of a long strip, a missing common ground, a data line that is too long or too close to power, or a controller that cannot refresh the pixel count. Test one section with a short data run; if the flicker moves with the content, check the controller or mapping.
9. What Mistakes Ruin a DIY LED Screen Build?
A failed DIY LED build is usually a planning error, not a soldering error. The six common mistakes are:
- Ignoring data direction. WS2812B strips have an arrow; reversing a section breaks the chain after that point.
- Forgetting the common ground. Without it, the first pixel receives a data signal with no reference and shows random colors.
- Under-sizing power injection. Long strips dim at the far end and shift color toward red.
- Running full white on a supply sized for average content. The supply trips or the connectors heat.
- Sealing a screen without service access. A failed module then means cutting the frame open.
- Buying no spares. A single failed module or receiving card can take the wall offline while a replacement ships.
10. How Do You Make an LED Screen That Works Outdoors?
An outdoor LED screen is a modular display with an IP65 or IP66 cabinet, UV-rated masks, waterproof connectors, and a thermal design that handles direct sun. The LED module alone is not enough; the cabinet, gasket, cable entry, and drainage path decide whether the screen survives the first rainy season. Brightness also changes: an outdoor wall needs 5,000–6,000 nits or more to compete with daylight, which raises power and heat.
For the product side, start with the P10 outdoor LED display collection and the outdoor LED module guide. Read the IP65 waterproofing guide before you design the cabinet entry.
Which Pixel Pitch Should an Outdoor LED Screen Use?
An outdoor pixel pitch is chosen by viewing distance and budget. A P10 screen reads from about 10 m and is the lowest-cost outdoor pitch; P8, P6, and P5 tighten the image for shorter viewing distances and raise the cost. Use the LED pixel pitch guide and the LED screen viewing angle guide to set the brief.
11. Conclusion: How to Make an LED Screen for Your Project
To make an LED screen, start with the viewing distance and the life the screen must deliver. A decorative matrix can be built at home with a controller, a 5V supply, and a frame. A commercial wall needs P10 or fine-pitch modules, receiving cards, a sending controller, and a cabinet system. A factory-made screen adds binning, sealing, aging, and calibration that a home build cannot reproduce. For a project quote, module selection, or a factory-built wall, the LED screen manufacturer team can turn the numbers above into a specification.
12. What Are the Most Common Questions About How to Make an LED Screen?
Can I make an LED screen at home?
Yes, for a small decorative or learning screen. Use WS2812B strips or HUB75/P10 modules, an ESP32 or Raspberry Pi, a 5V supply, and a frame. A home build is not a substitute for a commercial wall that must survive weather, run daily, and carry a warranty.
How much does it cost to make an LED screen?
A small ESP32 matrix starts around $30, a 32×32 matrix costs $150–$300, and a 7 ft decorative wall can be built for under $500. A commercial P10 wall costs $350–$650/m² for the screen body, and an 8×6 m installed wall can reach $19,000–$39,000 before freight and taxes.
What controller do I need to make an LED screen?
For DIY, an ESP32 with WLED or FastLED handles addressable strips; a Raspberry Pi suits HUB75 panels and video. For commercial walls, use a Novastar, Colorlight, or Huidu sending card with compatible receiving cards, and configure the screen in NovaLCT, LEDVISION, or HDPlayer.