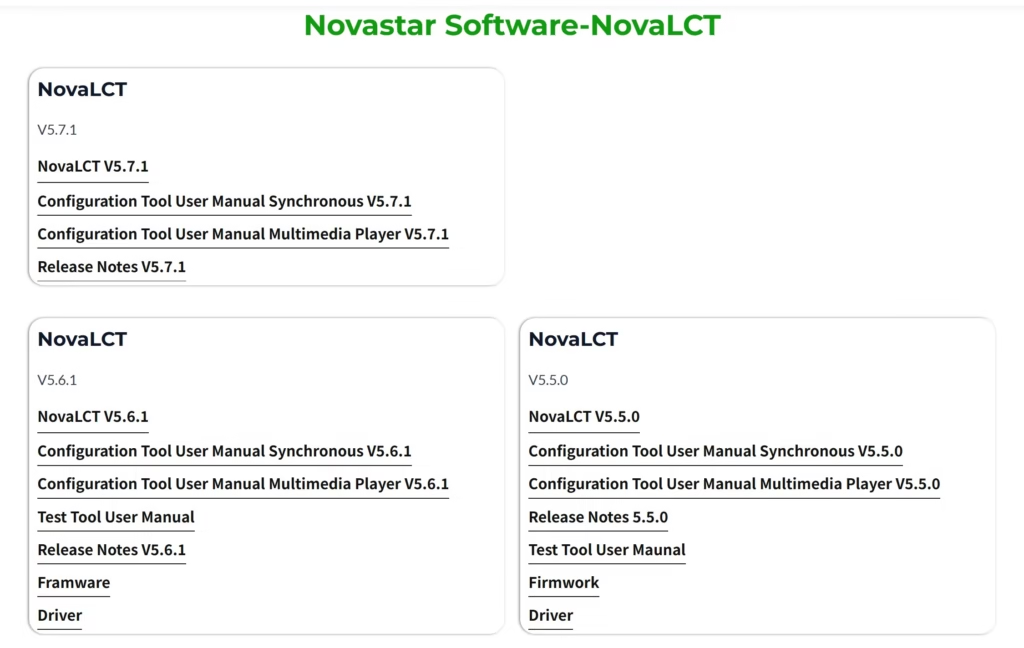
Download-Novastar System
UnifyLED specializes in mid-to-high-end LED display solutions and maintains close partnerships with internationally renowned control system manufacturers such as Novastar and Huidu, ensuring stable support for our customers’ projects.
Here, you can conveniently browse and download official documentation and materials for selected control systems, including user manuals, software drivers, and configuration guides, helping you quickly get started and resolve installation and commissioning issues in a one-stop manner.
Novastar Software-NovaLCT
Novastar LED Control System
MSD300
MSD600
Novastar LED Controler
Novastar Armor Series receiving card
Novastar MRV Series receiving card
MRV 570-1
MRV416-N
MRV412-N
LED Screen Inquiry
NovaStar LED Control System: Comprehensive Analysis and Download Guide
The delivery of compelling content on LED displays relies on an LED control system. NovaStar is a leading brand in this field, offering powerful solutions that manage everything from color accuracy to refresh rate. UnifyLED, in partnership with NovaStar, will explore the NovaStar LED control system, guide you through using its software, and provide the steps necessary to achieve optimal results with your LED displays.
Understanding NovaStar LED Control Systems
A NovaStar LED control system is the central nervous system of your LED display. It’s responsible for taking a video source and translating it into the signals that tell each individual LED what to do. This ensures that your content appears seamless and vibrant across the entire screen.
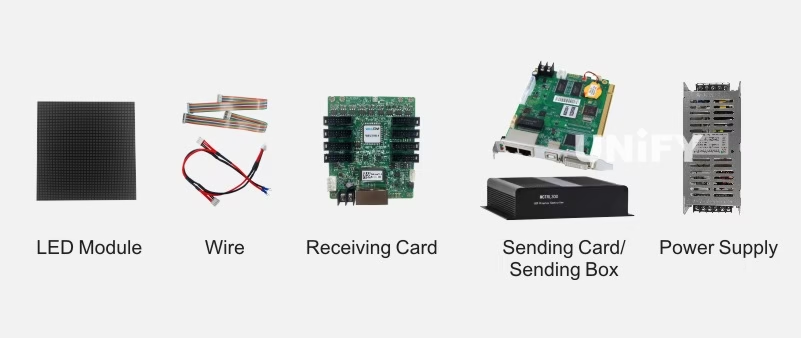
This system is more than just a single piece of hardware; it’s an ecosystem of components working together. From the display controller to the receiver card and driver IC, each part plays a vital role in achieving precise display control. Let’s look closer at these individual components and what makes NovaStar unique.
Main Components Explained
The primary components of a NovaStar system work in perfect harmony. It all starts with the sending card (or display controller), which is the brain of the operation. This device processes the video signal from your computer or media player and prepares it for the LED screen. It connects to your source via inputs like HDMI or DVI and sends the processed data out through its Gigabit Ethernet output ports.
Next in the chain are the receiving cards. These are installed inside the LED cabinets themselves. Each receiving card gets data from the sending card and distributes it to the LED modules it’s connected to. This is how a massive video wall can be controlled with pixel-perfect accuracy.
Finally, you have the LED modules and the power supply. The power supply provides the necessary electricity to run the entire display, while the LED modules contain the actual LEDs and driver ICs that light up to create the image. Together, these parts form a complete system for managing and displaying your content.
Key Terminology to Know
As you get more familiar with LED displays, you’ll encounter some specific terminology. Understanding these terms will help you better grasp how the technology works and how to optimize your screen for the best performance.
Refresh Rate: Measured in Hertz (Hz), this is how many times per second the display redraws the image. A higher refresh rate (e.g., 3840Hz or more) results in smoother motion and eliminates visible flicker.
Sending Card: The main controller that processes the video signal and sends it to the receiving cards.
Receiver Card: A card inside each LED cabinet that receives signals from the sending card and controls the local LED modules.
Color Temperature: This describes the hue of white light, measured in Kelvin (K). Adjusting it helps achieve the desired white balance, from a warm, yellowish tone to a cool, bluish one.
Color Gamut: The range of colors that a display can reproduce. A wider color gamut means more vibrant and accurate colors.
These terms are fundamental to configuring and calibrating your LED display for optimal visual quality.
Core Features of the NovaLCT Configuration Tool
The NovaLCT configuration tool is the software heart of the NovaStar system. It’s a powerful application that gives you complete control over your display controller and the entire LED screen. With NovaLCT, you can manage everything from basic setup to advanced calibration, ensuring your display looks exactly how you want it to.
This tool is designed for a wide range of display applications, offering robust device connectivity and real-time monitoring capabilities. Let’s explore some of its most important features, including how it handles device connections and its screen monitoring functions.
Device Connectivity and Compatibility
One of the standout features of NovaLCT is its straightforward device connectivity. The software automatically detects NovaStar controllers connected to your computer’s network, typically via Gigabit Ethernet ports. This makes the initial setup process much simpler, as you don’t have to manually search for and add each device.
The software ensures compatibility across a wide range of NovaStar hardware, from sending cards to receiving cards. Once connected, NovaLCT provides a clear overview of all detected devices, including their status and the specific output ports they are using. This centralized view allows you to manage multiple controllers and screens from a single interface.
This robust compatibility and easy connection process are crucial for professionals who need to set up complex display systems quickly and reliably. Whether you’re managing a single screen or a network of displays, NovaLCT streamlines the process of getting all your hardware to communicate effectively.
Real-Time Screen Monitoring Functions
To maintain excellent display quality, you need to know what’s happening with your screen at all times. NovaLCT offers powerful real-time screen monitoring functions that provide instant feedback on the health and status of your LED display. This allows you to identify and address potential issues before they impact the viewing experience.
This proactive approach to screen monitoring is invaluable, especially during live events or for mission-critical display applications. The software can alert you to a range of problems, from a faulty cable to an overheating module.
Key real-time monitoring capabilities include:
Temperature Monitoring: Tracks the temperature of receiving cards to prevent overheating.
Voltage Status: Monitors the power supply voltage to ensure stable operation.
Signal Status: Checks the data transmission between the sending and receiving cards to detect signal loss.
Error Detection: Identifies issues like a continuous black screen or malfunctioning pixels.
Running Time: Logs the operational hours of the display for maintenance scheduling.
Preparing for Installation
Before you jump into the software setup, it’s important to prepare your physical hardware. Proper preparation ensures that the installation process goes smoothly and that your LED display functions correctly from the start. This involves double-checking your hardware, cabling, and power supply connections.
Taking a few moments to verify your setup can save you a lot of troubleshooting time later. Once your hardware is ready, the next step is to get the necessary software. We’ll cover how to check your hardware needs and then guide you on downloading the latest version of NovaLCT.
Checking Hardware and Cabling Needs
First, ensure that all your hardware components are correctly installed. This means confirming that the sending card is properly seated in your computer or video processor and that all receiving cards are securely placed within the LED cabinets. Check that every cabinet is receiving power from a stable power supply.
Next, inspect all your cabling. Are the Ethernet cables connecting the sending card to the first receiving card, and then daisy-chaining between cabinets, securely plugged in? Faulty or loose cables are a common source of signal issues. It’s also wise to verify that the ribbon cables connecting the receiving cards to the LED modules and their driver IC components are firmly attached.
Finally, make sure your video source is connected to the correct input on the sending card (e.g., HDMI, DVI). A simple check of all physical connections is a crucial first step for successful display control and can prevent many common setup headaches.
Downloading the Latest NovaLCT Software
With your hardware in place, it’s time to download the NovaLCT software. Always use the latest version to ensure you have access to new features, bug fixes, and compatibility with the newest hardware. Using outdated software can lead to performance issues or prevent you from accessing the full potential of your LED display solutions.
You can find the official software on the this website. Navigating to their download section will give you access to the most recent release for your operating system.
Here’s how to download it:
Locate the “Control Software” section.
Find the latest version of NovaLCT and click the download link.
Save the installer file to a location you can easily access on your computer.
Once the download is complete, you will be ready to proceed with the installation.
Step-by-Step NovaLCT Software Installation Guide
Now that you have the installer file, the next phase is the software installation. The setup procedure for NovaLCT is generally straightforward, but it’s important to follow the steps carefully to ensure all components are installed correctly. This will allow the software to communicate properly with your hardware.
The process varies slightly depending on your operating system. We will provide a detailed guide for both Windows and Mac OS users to help you get the software up and running without any hitches.
Setup Procedure for Windows
Installing NovaLCT on a Windows PC is a simple, wizard-driven process. Before you begin, make sure you have administrative privileges on your computer, as the installer may need to install drivers and other system components. Locate the setup file you downloaded in the previous step to get started.
Double-click the installer file to launch the setup wizard. You will be guided through a series of prompts. It’s generally best to stick with the default settings unless you have a specific reason to change the installation directory. The wizard will handle the installation of the main application as well as any necessary drivers for device communication.
Here is a quick step-by-step summary of the installation process:
Step | Action |
|---|---|
1. Run Installer | Right-click the downloaded .exe file and select “Run as administrator.” |
2. Follow Prompts | Click “Next” through the setup wizard, accepting the license agreement. |
3. Choose Location | Keep the default installation folder or choose a custom one. |
4. Install Drivers | Ensure any prompts to install device drivers are accepted. |
5. Finish | Once the installation is complete, click “Finish” to close the wizard. |
Setup Process for Mac OS
While NovaStar primarily focuses on the Windows platform for its configuration tools, they also offer solutions for Mac OS users. The installation process on a Mac is similar to that of other applications. You will typically download a .dmg file from the NovaStar website.
Once downloaded, open the .dmg file. This will mount a virtual disk containing the NovaLCT application. To install it, simply drag the NovaLCT icon into your “Applications” folder. After the copy is complete, you can eject the virtual disk and launch the software from your Applications folder.
It’s important to note that while a Mac version is available, some advanced features or compatibility with older hardware might be limited compared to the Windows version. For the most comprehensive control, many professionals run NovaLCT on a Windows machine or use a Windows partition (via Boot Camp) on their Mac.
Initial Software Setup & User Interface Walkthrough
After successfully installing NovaLCT, the next step is to launch the application and familiarize yourself with its user interface. The initial setup involves logging in and connecting the software to your control hardware. The interface is designed to provide a clear path to all its powerful functions.
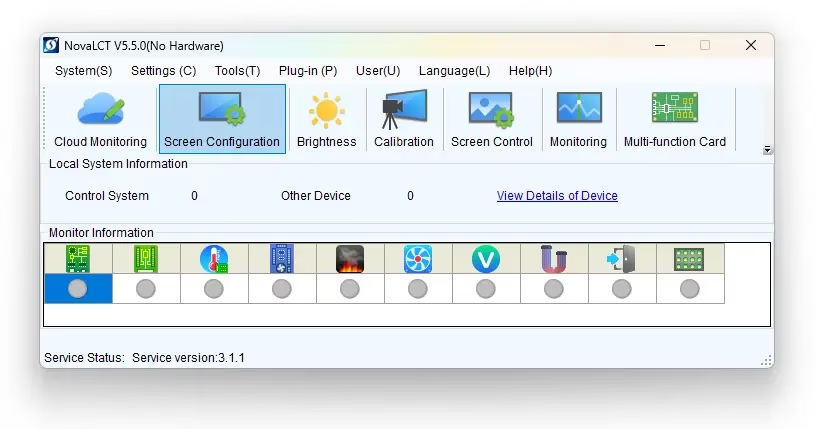
The main dashboard gives you a real-time overview of your connected devices and provides access to configuration, monitoring, and advanced features. Let’s walk through navigating the dashboard and establishing your first device connection.
Navigating the Dashboard
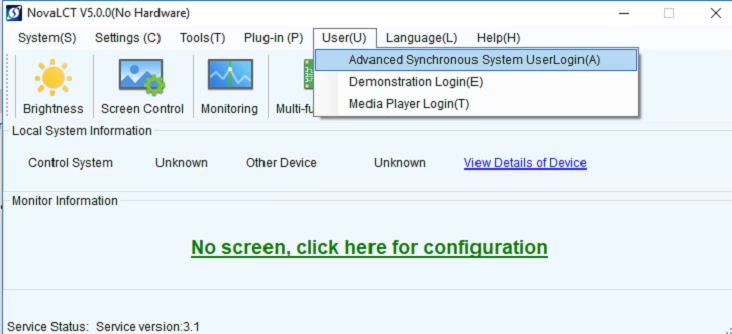
When you first open NovaLCT, you’ll be prompted to log in. For initial setup, you’ll typically select “Advanced User Login” and use the default password, which is often “admin.” Once logged in, you’ll be greeted by the main dashboard, which is your central hub for all display control tasks.
The user interface is organized into logical sections. You’ll usually find menus or tabs for “Screen Control,” “Brightness,” and “Device Monitoring.” The Screen Control section is where you’ll spend most of your time during the initial setup, as this is where you configure the layout and properties of your LED display.
Take a moment to explore the different menus and familiarize yourself with the layout. The dashboard is designed to provide quick access to the most commonly used tools, making the complex task of screen configuration more manageable. You can typically see a list of connected devices and their status directly on this main screen.
Establishing Device Connections
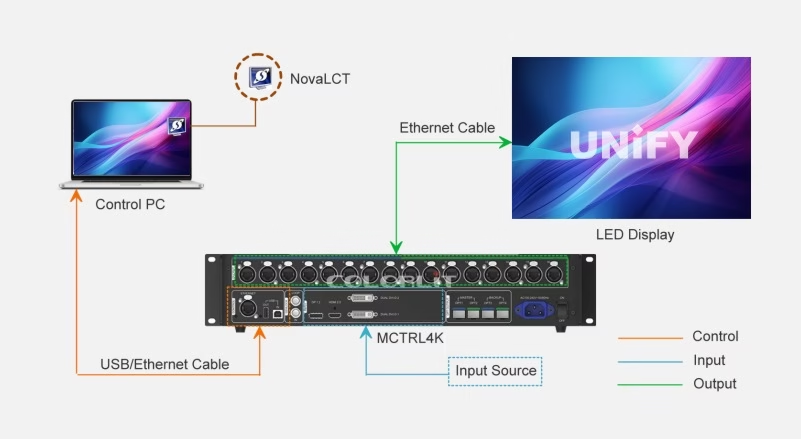
Before you can configure your screen, you need to ensure NovaLCT is communicating with your sending card. The software should automatically detect any connected NovaStar controllers on the same network. If your device doesn’t appear automatically, you can use the “Search All” or “Refresh” function to scan for it.
Once the sending card is detected, you can select it to establish a connection. This link is crucial for data transmission, as all the configuration settings you create in the software will be sent to the controller and then relayed to the receiving cards in your LED display. The setup procedure requires this connection to be active.
If you have trouble connecting, double-check your network settings and cabling. Ensure your computer’s firewall isn’t blocking the application and that your computer is on the same IP address subnet as the controller. A solid connection is the foundation for all subsequent display control tasks.
LED Display Configuration Using NovaLCT
With your hardware connected and the software running, you’re ready for the most critical part: configuring your LED display. This process involves telling the system how your LED cabinets are arranged and mapping the data flow from the sending card to each receiver card.
Proper configuration is essential for achieving optimal display performance.
A mistake here can result in a scrambled image or parts of the screen not working at all. We’ll guide you through mapping your receiver cards and then assigning the correct screen layout and resolution.
Mapping Receiver Cards
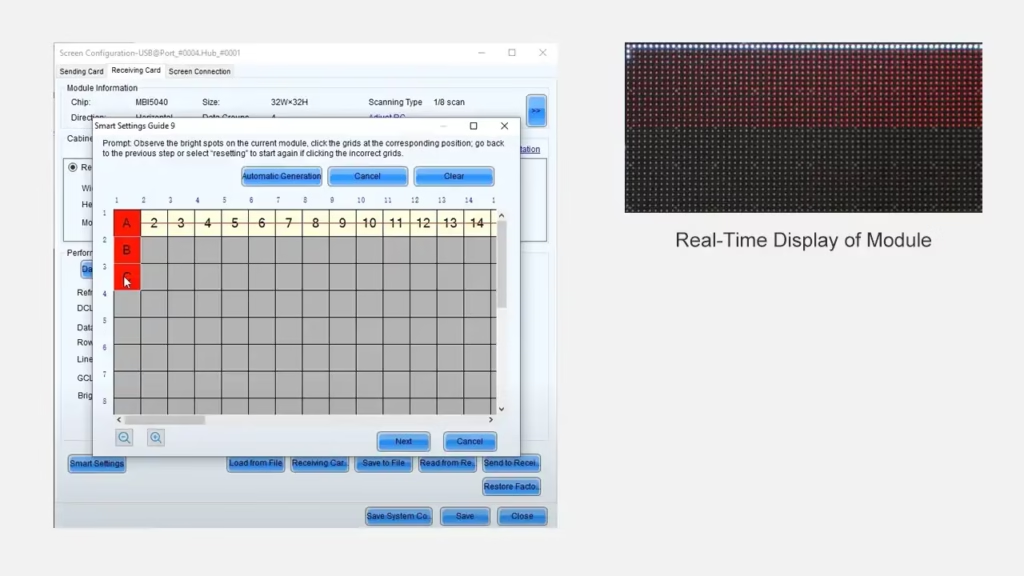
The first step in configuration is to enter the “Screen Configuration” section of NovaLCT. Here, you will define the physical arrangement of your LED cabinets.
This process, often called mapping, ensures that the controller knows the exact position of each receiver card in the overall display.
You’ll start by specifying the number of receiver cards you have horizontally and vertically. NovaLCT then presents a grid representing your display. You need to map the data path, which is the order in which the Ethernet signal flows from one cabinet to the next.
You can typically do this by clicking and dragging to draw the connection path, starting from the cabinet connected to the sending card’s output port.
This mapping is what enables precise display control at the pixel level. By telling the system how the data flows, you ensure that the correct portion of the video signal is sent to each specific cabinet, resulting in a single, coherent image across the entire LED wall.
Assigning Screen Layouts and Resolutions
After mapping the receiver cards, you need to define the properties of the LED modules themselves. This involves loading a special configuration file (an .rcfgx file) that contains information about the LED modules, such as their resolution and the type of driver IC they use. This file is usually provided by the display screen manufacturer.
Once the file is loaded, you can set the final screen layout and resolutions. You’ll specify the resolution of each individual cabinet and the total resolution of the entire display. This step ensures that the video source is scaled and displayed correctly.
Key steps in this process include:
Loading the RCFGX file: Select the correct configuration file for your LED modules.
Setting Cabinet Resolution: Enter the pixel width and height of a single cabinet.
Defining the Array: Confirm the number of cabinets in your horizontal and vertical layout.
Sending to Hardware: Send the completed configuration to the sending card and receiving cards to save the settings.
This finalizes the basic setup, allowing your display to show a proper image. From here, you can move on to fine-tuning aspects like high brightness and color reproduction.
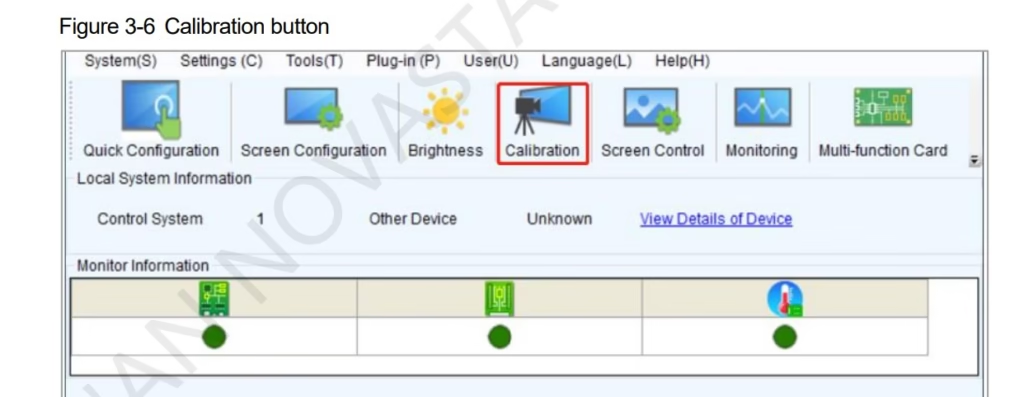
NovaStar Calibration Processes
Getting your screen to display an image is just the first step. To achieve a truly professional look, you need to calibrate it. Calibration is the process of adjusting the display to ensure uniform brightness and consistent color across all LED modules. NovaStar’s calibration system provides powerful tools for this purpose.
You can make basic adjustments to the brightness level and color temperature or perform advanced calibration for perfect uniformity. Let’s explore both of these processes to help you get the most out of your display.
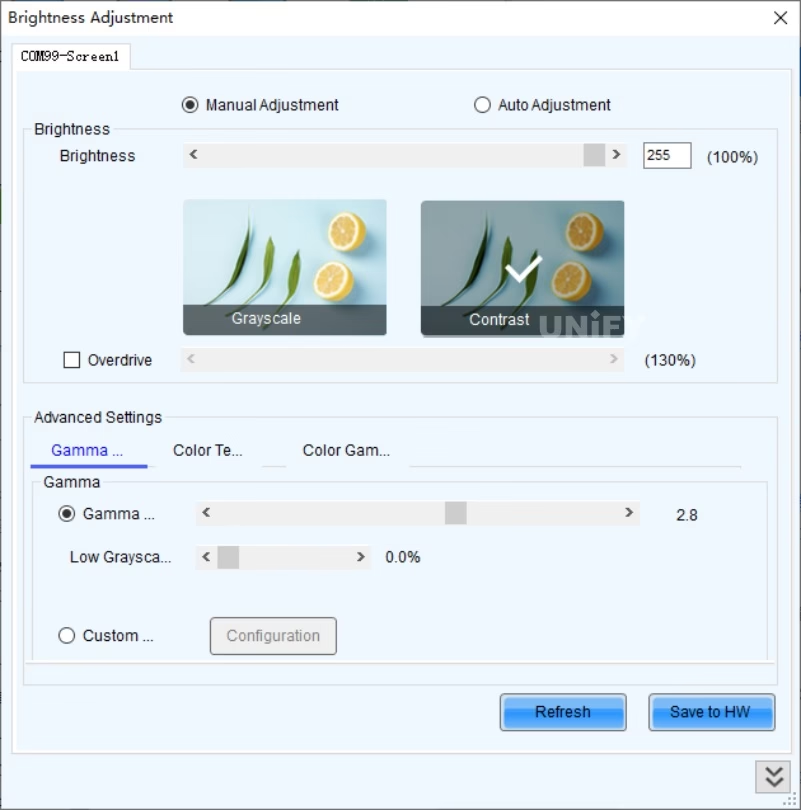
Brightness and Color Adjustment
The most basic form of calibration involves adjusting the overall brightness and color of the display. Within NovaLCT, you can easily set the global brightness level to suit your viewing environment. For an indoor setting, you might lower the brightness, while an outdoor display in sunlight will require a much higher setting.
Color adjustment is equally important for achieving the right look. You can adjust the white balance to ensure that white colors appear pure and not tinted with yellow or blue. This is done by modifying the red, green, and blue gain levels until you achieve a neutral white.
Additionally, you can fine-tune other parameters like the contrast ratio and color saturation to make the image pop. These adjustments are subjective and depend on the content being displayed, but they offer a quick way to enhance the visual impact of your screen without needing specialized equipment.
Advanced Calibration for Uniformity
For the highest level of quality, especially on large video walls, advanced calibration is necessary. Over time or due to manufacturing variations, different LED modules can have slight differences in brightness and color. This can result in a “patchwork” effect that disrupts the image. NovaStar’s advanced calibration system corrects this at the pixel level.
This process typically requires a specialized camera and software that measures the output of each individual pixel. The software then generates a correction file that is uploaded to the receiving cards. This file adjusts the brightness and color of each pixel to match a uniform standard, making the entire display appear as a single, seamless screen.
Key benefits of advanced calibration include:
Perfect Uniformity: Eliminates visible seams or color shifts between cabinets.
Improved Color Accuracy: Ensures every pixel produces the correct color.
Extended Display Life: Allows you to match new modules to older ones, extending the usable life of your display.
While more complex, this process is one of the most powerful advanced features for achieving broadcast-quality results.
Troubleshooting Common Issues
Even with the best hardware, you might occasionally run into issues. Whether it’s a flickering screen or an error code, knowing how to approach troubleshooting can save you time and stress. Many common problems with LED display applications can be resolved with a few simple checks.
We’ll cover how to resolve some of the most frequent problems, such as display flicker and signal loss. We will also discuss the importance of firmware updates and how to interpret error codes to diagnose issues more effectively.
Resolving Display Flicker or Signal Loss
Display flicker or intermittent signal loss is one of the most common issues users face. The problem often lies in the physical connections responsible for data transmission. Before diving into complex software settings, always start with a physical inspection of your setup.
A flickering screen can be caused by a poor refresh rate setting, but it’s more frequently due to a bad cable or a loose connection. If a single cabinet or a section of the screen is having problems, check the Ethernet cables leading to and from that cabinet. Reseating or replacing the cable often resolves the issue.
Here are some quick troubleshooting steps:
- Check All Cables: Ensure all Ethernet and power cables are securely plugged in at both ends.
- Replace Suspect Cables: If a specific cabinet is failing, try swapping its input Ethernet cable with a known good one.
- Verify Power: Make sure every cabinet and the controller have a stable power source.
If these steps don’t work, the issue may be with a faulty receiving card or sending card port.
Firmware Updates and Error Codes
Keeping your hardware’s firmware up to date is a crucial part of maintenance. Firmware updates released by NovaStar often include bug fixes, performance improvements, and support for new features. If you’re experiencing persistent or unusual issues, checking for a firmware update for your sending and receiving cards should be one of your first steps.
Sometimes, the system will tell you exactly what’s wrong by displaying error codes. NovaStar’s monitoring software can report errors related to temperature, voltage, or data transmission. For example, the hardware’s ability to perform open and short circuit detection can help pinpoint physical faults in the LED modules.
When troubleshooting with firmware and errors, remember to:
Check for Updates: Regularly visit the NovaStar website for the latest firmware for your specific models.
Document Error Codes: Take note of any specific error codes or messages reported by NovaLCT. This information is invaluable if you need to contact technical support.
Update Systematically: When updating firmware, follow the provided instructions carefully to avoid interrupting the process, which could damage the hardware.
NovaStar LED Driver IC Solutions
At the very core of display performance is the LED driver IC. This tiny chip is responsible for regulating the power to each LED, which directly impacts brightness, color, and refresh rate. NovaStar has developed innovative driver IC solutions that combine PWM and PAM regulation to push the boundaries of visual quality.
These advanced chips are designed to address common challenges like energy consumption and low-light performance. We will explain how PWM and PAM work together and look at specific application scenarios where these driver ICs make a significant difference.
PWM & PAM Regulation Explained
Traditionally, LED brightness is controlled using Pulse Width Modulation (PWM). PWM works by turning the LED on and off at a very high frequency. The longer the “on” time (the duty cycle), the brighter the LED appears. This method is effective but can struggle at very low brightness levels, sometimes causing poor grayscale performance.
NovaStar’s innovation is to combine PWM with Pulse Amplitude Modulation (PAM). PAM adjusts the amplitude of the electrical current—in other words, it controls how much power the LED gets. By using a hybrid approach, the driver IC can use PAM for larger brightness adjustments and PWM for fine-tuning.
This dual-regulation method, combined with advanced video processing on the sending and receiving cards, allows for a much greater dynamic range. The result is deeper blacks, higher peak brightness, and exceptional grayscale detail, even at very low brightness levels. This technology ensures a constant current for stable performance across all conditions.
Application Scenarios for Driver ICs
The benefits of NovaStar’s advanced driver ICs are best seen in demanding display applications. Different scenarios require different performance characteristics, and NovaStar offers a range of chips, like the TBS series, to meet these needs.
For example, in virtual production and XR shooting, ultra-high refresh rates and low latency are critical to avoid camera artifacts. Driver ICs like the TBS5367 are designed for these environments, delivering refresh rates up to 15360Hz and superior grayscale performance. For high-end rental displays, chips that offer high contrast and energy efficiency are preferred.
Here are some common application scenarios:
XR and Broadcast: Requires extremely high refresh rates and perfect color reproduction.
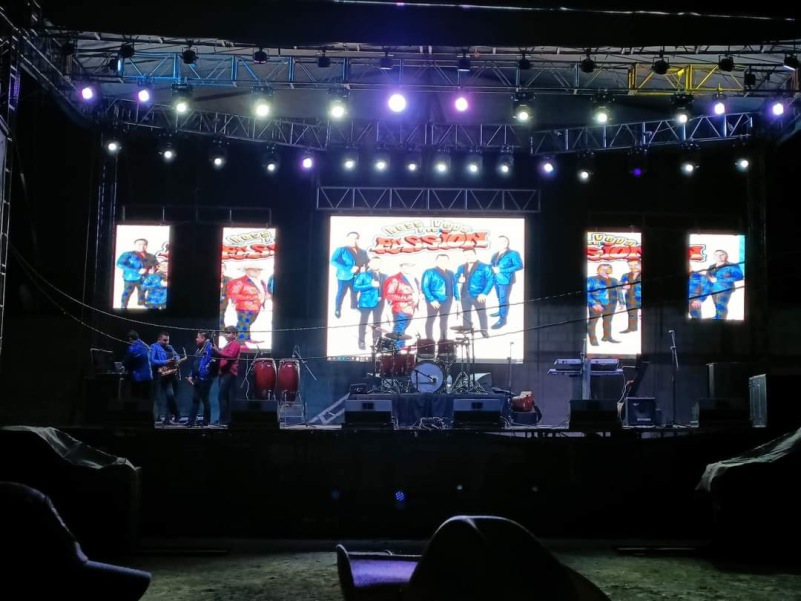
High-End Rental LED Wall: Needs durability, high contrast, and energy efficiency for dynamic use.
Fine-Pitch Fixed Installation display: Demands exceptional uniformity and low-temperature operation.
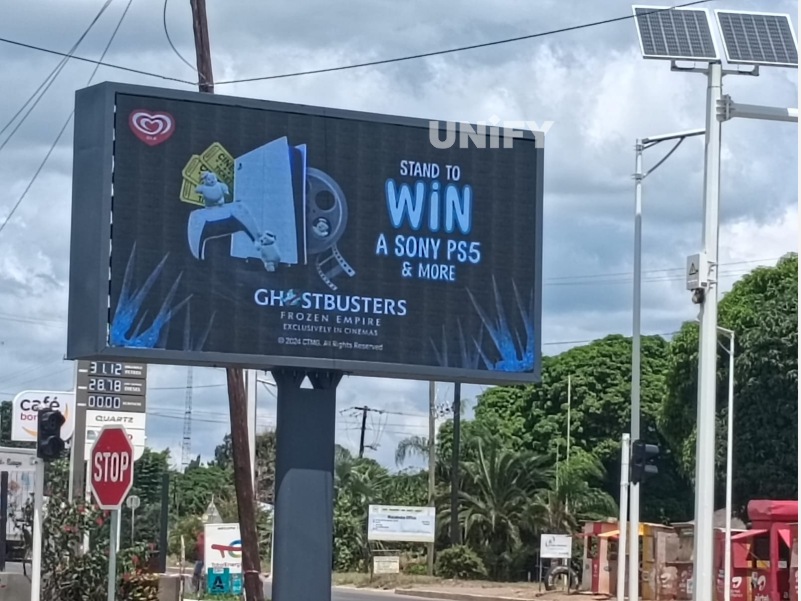
Outdoor Advertising screen: Prioritizes high brightness to compete with sunlight and lower power consumption to reduce costs.

FAQs
NovaLCT is professional software provided by NovaStar for configuring and managing LED screens. It allows for screen parameter settings, receiver/transmitter card configuration, color and brightness adjustment, multi-screen splicing, and fault diagnosis. It serves as the "operation center" of LED screens.
This usually happens when the resolution settings don’t match, or the receiving card configuration isn’t correct.
Steps to check:
- Go to the Sending Card page in NovaLCT and compare the sending card resolution with the graphics card output resolution. If they are different, set them to the same value.
- If the resolutions already match, open the Smart Configuration Wizard and check the following:
Whether pixel width and height match the actual cabinet size
Whether scan type and module size are set correctly
Whether the correct receiving card configuration file is loaded
A mismatch in any of these settings can cause the screen to show incorrect images, only light up partially, or stay black.
The MCTRL series focuses on high-performance image processing and driving large-scale LED screens, suitable for stage performances, large advertising screens, and stadiums. Typical products include the MCTRL4K and MCTRL660 PRO.
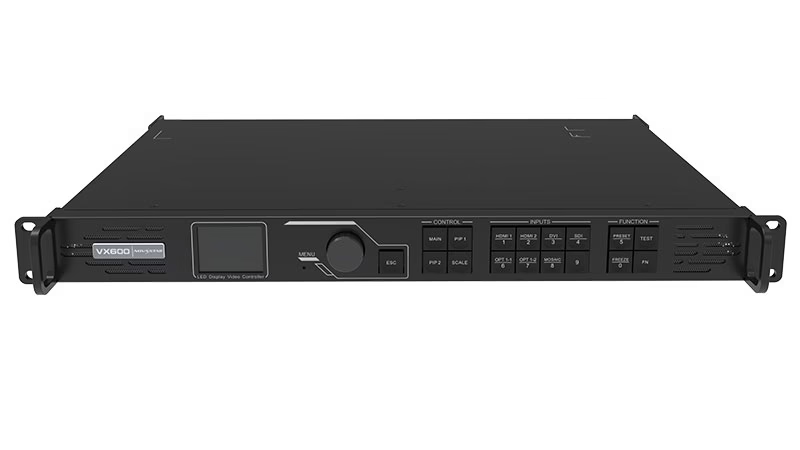
The VX series integrates video splicing and multi-signal input functions, making it suitable for signal management in various scenarios, such as conference centers, exhibition halls, and command and dispatch centers. The VX Pro series offers more powerful interfaces and processing capabilities.
The choice of receiver card depends on the screen's pixel pitch, resolution, refresh rate, and power requirements.
The MRV Series offers a wide range of models to meet different module and resolution requirements, making it suitable for general projects.
The Armor Series focuses on high refresh rates and new feature expansions, making it suitable for applications requiring high image quality and stability.
The NovaLCT software and most control system tools are compatible with Windows systems (Windows 7 and above). Mac and Linux users will need to use a Windows PC or a virtual machine.