How to Repair P6 Outdoor LED Display Sign Board Screen
- Home
- »
- LED Display Technology
- »
- How to Repair P6 Outdoor LED Display Sign Board Screen
Table of Contents
For any stadium manager or outdoor advertiser, a glitching screen or a blacked-out cabinet is a nightmare. It means lost advertising revenue and a damaged brand image. At UnifyLED, we understand that maintaining the perfect performance of your LED stadium display is just as important as the initial installation. However, outdoor environments are harsh. Rain, humidity, and heat can eventually lead to hardware failures. Learning how to repair p6 outdoor led display sign board screen issues effectively is a critical skill for your maintenance team.
In this expert guide, we will walk you through the professional process of diagnosing faults, swapping modules, and ensuring your IP65 waterproof rating remains intact—without the need for risky on-site soldering.
1. Diagnosing Before You Repair LED Screen Failures
Before you grab a screwdriver, you must identify the root cause. Attempting to repair led screen hardware without a clear diagnosis can waste time and spare parts. For P6 outdoor screens, issues usually fall into three distinct categories.
The "Blackout" (Power Supply Issue)
If an entire cabinet (usually a 960mm x 960mm section) goes dark while the rest of the screen is working, the LEDs are likely fine. The culprit is usually the Power Supply Unit (PSU) or the main AC power cable.
Sign: The receiving card inside the cabinet has no green indicator light.
The "Snow" or "Flickering" (Signal Issue)
If the screen is showing static noise, random flashing colors, or the image is shaking, this is rarely a module failure. It indicates a data transmission problem.
Sign: The issue affects a row or a specific area, and wiggling the cables changes the pattern. This points to a loose Flat Ribbon Cable or a faulty Ethernet cable.
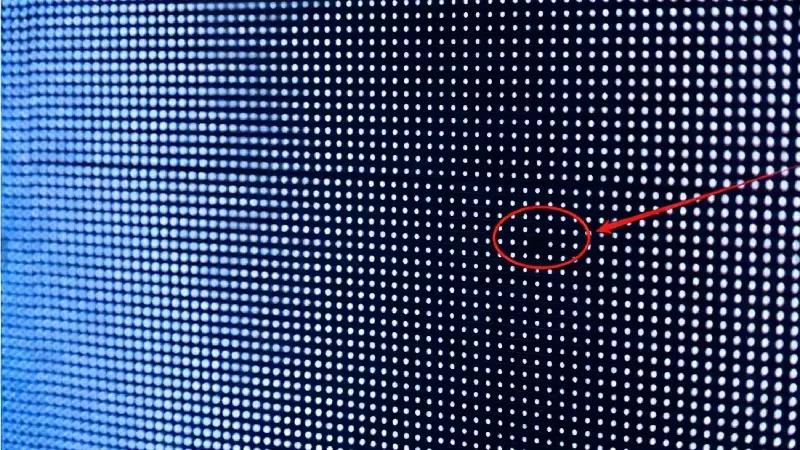
The "Dead Block" (Module Issue)
If a specific square block (typically 192mm x 192mm for P6) is completely off, or shows weird colors while the surrounding blocks are normal, the specific LED module is damaged.
Sign: The fault is localized and static. This is the most common repair scenario we will address below.
2. How to Repair P6 Outdoor LED Display Sign Board Screen (The Module Method)
When people ask how to repair p6 outdoor led display sign board screen pixel failures, they often imagine using a soldering iron to fix individual LED beads. While this works for indoor screens, it is not recommended for outdoor environments.
Outdoor P6 modules are coated with a waterproof potting compound to achieve their IP65 rating. Attempting to solder manually breaks this protective seal, leading to future corrosion. The professional industry standard is Module Replacement. This method is faster, safer, and guarantees the waterproof integrity of your display.
Tools You Will Need:
Spare P6 Modules: Crucially, these should be from the same production batch as your current screen to ensure color consistency.
Phillips Screwdriver: Preferably magnetic, to prevent screws from falling during high-altitude work.
Multimeter: To verify voltage if the new module doesn’t light up.
Step-by-Step LED Board Replacement Process
Follow this procedure to replace a faulty module on your stadium screen or billboard safely.
Step 1: Safety First (Power Off)
Always turn off the power to the specific cabinet you are working on. Although the internal voltage is 5V DC, live-swapping can cause electrical surges that damage the receiving card or the new module’s ICs.
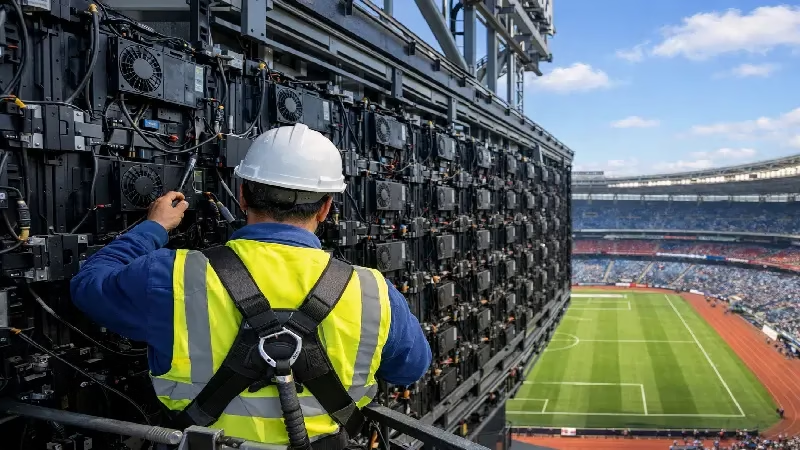
Step 2: Access and Disconnect
Open the rear maintenance door of the cabinet. Locate the faulty module. You will see two cables connected to it:
Power Cable (Red/Black): Press the clip and pull it out.
Flat Ribbon Cable (Data): Unplug it gently. Tip: Remember the direction of the cable; plugging it in reverse will cause the module to fail.
Step 3: Remove the Module
Use your screwdriver to remove the retaining screws (usually 4 to 6 screws per module). Gently push the module outwards (towards the front of the screen) and remove it.
Step 4: The Waterproof Check (Crucial)
Do not skip this step. Before installing the new unit, inspect the waterproof sealing strip (gasket) located on the frame or the back of the module kit.
Why it matters: This seal is the only barrier protecting your power supplies and receiving cards from rain and moisture.
Action: Ensure the sealing strip is intact, clean, and properly seated in its groove. If the seal is flattened, cracked, or missing, do not install the module. You must ensure a perfect seal to maintain the screen’s IP65 rating.
Step 5: Installation and Securing
Insert the new module into the slot. When tightening the screws, use an “X” pattern (tighten top-left, then bottom-right, etc.). This ensures even pressure on the waterproof sealing strip, preventing water leaks during heavy rain.
Step 6: Power Up and Test
Reconnect the power and data cables, then turn the power back on. The module should light up immediately.
3. Why Your P6 Outdoor LED Display Screen Does Look Different After Repair?
You have successfully replaced the dead module, but now you face a new problem: the new block stands out like a sore thumb. It might be brighter, dimmer, or have a slightly different color tone compared to the rest of the wall. This is a common frustration where users ask: “Why my p6 outdoor led display screen does look different even though I used the same model?”
The Cause: LED "Binning" and Aging
LEDs are manufactured in batches (bins). Even if you buy the exact same P6 module from the same manufacturer, a batch produced today will have slightly different brightness and wavelength characteristics than a batch produced two years ago. Furthermore, your existing LED stadium display has likely dimmed over time due to aging, while the spare module is brand new and running at 100% brightness.
The Solution: Pixel-by-Pixel Calibration
Don’t panic; you don’t need to replace the whole screen. You need to perform Calibration (Correction) using the control software (such as NovaLCT or LEDStudio).
Adjust Coefficients: Access the calibration tab in your software.
Target the Area: Select the coordinates of the newly installed module.
Manual Tuning: Lower the Red, Green, and Blue (RGB) brightness coefficients of the new module until it visually blends in with the surrounding aged modules.
Save to Hardware: Click “Save” to burn these settings into the receiving card.
Expert Note: If your screen is too old and the difference is too stark to calibrate, it might be a sign that your display has reached its end of life.
4. Maintenance Tips for Your LED Stadium Screen
Preventing a failure is always cheaper than fixing one. For large-scale installations, such as an LED stadium display used in football or baseball venues, downtime is not an option. Here is how UnifyLED experts recommend you maintain your investment.
The "Dehumidification" Mode
Outdoor screens in stadiums often sit idle between match days. If moisture accumulates inside the SMD LED packages and you suddenly run the screen at 100% brightness, the rapid heat expansion can cause the LEDs to explode (the “caterpillar” effect).
Best Practice: Once a week, run the screen starting at 10% brightness and gradually increase it to 100% over a 2-hour period. This gently evaporates any internal moisture.
Regular Power Supply & Cooling Inspection
In P6 outdoor screens, the Power Supply Unit (PSU) generates significant heat.
Check: Every 6 months, open the rear cabinets. If your PSUs have cooling fans, ensure they are spinning freely and not clogged by dust. For fanless designs, check that the metal heat sinks and ventilation grills are not blocked by dirt or spider webs. Overheating is the first cause of blackouts.
5. Conclusion
Mastering how to repair p6 outdoor led display sign board screen issues gives you the confidence to keep your advertising and events running smoothly. By following the correct module replacement procedures—especially ensuring the waterproof sealing strip is intact—and knowing how to calibrate new modules, you can extend the lifespan of your display significantly.
However, if your current screen requires constant repairs and is costing you more in maintenance than it earns in revenue, it might be time for an upgrade. UnifyLED offers state-of-the-art LED Stadium Screens designed with high-stability components and easy-maintenance features to withstand the toughest outdoor environments.
6. FAQs
We strongly advise against it. Unlike indoor screens, P6 outdoor led display sign board screens use a waterproof potting compound (glue) to protect the circuits. Hand-soldering destroys this seal, leading to corrosion and future failures. The professional standard is to replace the entire module to maintain the IP65 rating.
This is a common issue caused by LED aging and different production batches. Your existing screen has dimmed over time, while the new spare module is at 100% brightness. You can fix this by performing Pixel-by-Pixel Calibration in your control software (like NovaLCT) to lower the brightness coefficients of the new module to match the wall.
For a high-performance LED stadium display, we recommend a visual inspection every 3-6 months. Crucially, if the screen is not used often, turn it on at least once a week for 2 hours using a "dehumidification mode" (gradually increasing brightness) to prevent moisture damage to the SMD components.
A complete blackout of a cabinet (typically 960mm x 960mm) usually points to a Power Supply Unit (PSU) failure or a loose main power cable. It is rarely an issue with the LED modules themselves. Check if the indicator light on the receiving card is on; if not, the PSU likely needs replacement.
Flickering after rain often indicates water ingress affecting the signal transmission. Check the waterproof sealing strip on the modules and the cabinet doors. If the gasket is aged or displaced, moisture can enter the HUB board or ribbon cables, causing signal instability.
7. Recommend
Outdoor Waterproof LED Screen: Technical Guide for Buyers and Project Owners
Outdoor Waterproof LED Screen: Technical Guide for Buyers and Project Owners Home Are you planning an outdoor display project but feeling overwhelmed by technical specifications? Choosing the right Outdoor Waterproof LED Screen is not just about brightness—it’s about ensuring long-term performance against rain, salt spray, and extreme temperatures. This comprehensive technical guide covers everything you need to
Digital Signage Saudi Arabia Solutions for NEOM and Vision 2030
Discover advanced Digital Signage Saudi Arabia solutions for smart cities. Elevate your mega-projects with our eco-friendly, heat-resistant LED displays.

Ultimate Guide: Rental LED Screen Supplier Saudi Arabia | UnifyLED
Need a reliable rental LED screen supplier in Saudi Arabia? Elevate your Riyadh Season events with UnifyLED’s weather-proof, fast-setup GOB LED screens.