Common Tools and Instrument Operation Skills for LED Display Installation and Maintenance
- Home
- »
- LED Display Technology
- »
- Common Tools and Instrument Operation Skills for LED Display Installation and Maintenance
Table of Contents
Voltage Testers Operation Skills
Low-Voltage Neon Bulb Tester Structure and Usage (1) Low-voltage neon bulb tester structure. The low-voltage neon bulb tester is an essential safety tool for electricians in industrial and mining enterprises. It is used to detect whether lines or equipment below 500V have power frequency voltage, ensuring the personal safety of maintenance personnel during power outages. The common neon bulb low-voltage tester, also known as a test pencil, has a detection voltage range of typically 60-500V. It is often made in the style of a pen or a screwdriver, as shown in Appendix Figure C-1.
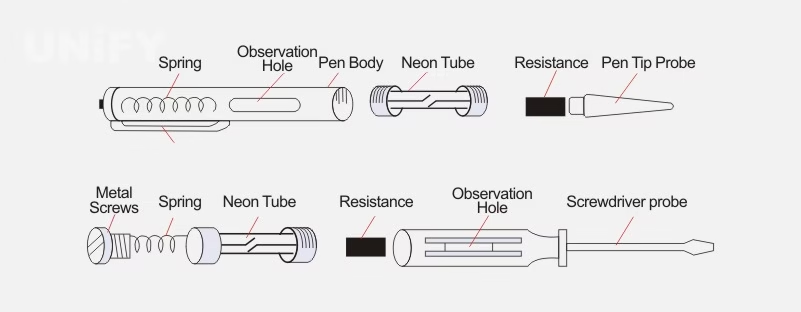
Appendix Figure C-1 Low-Voltage Neon Bulb Tester (a) Pen-style low-voltage neon bulb tester; (b) Screwdriver-style low-voltage neon bulb tester
(2) Low-voltage neon bulb tester usage and precautions. When using a low-voltage neon bulb tester, you must touch the metal part at the end of the tester with your finger, and keep the small neon window away from the light and facing you, to easily observe the brightness of the neon tube and avoid misjudgment due to strong light. Its usage is shown in Appendix Figure C-2. When testing a live body with the tester, current flows through the live body, the tester, the human body, and the ground, forming a complete circuit. As long as the potential difference between the live body and the ground exceeds 60V, the neon tube in the low-voltage neon bulb tester will light up. The following points should be noted when using the low-voltage neon bulb tester:
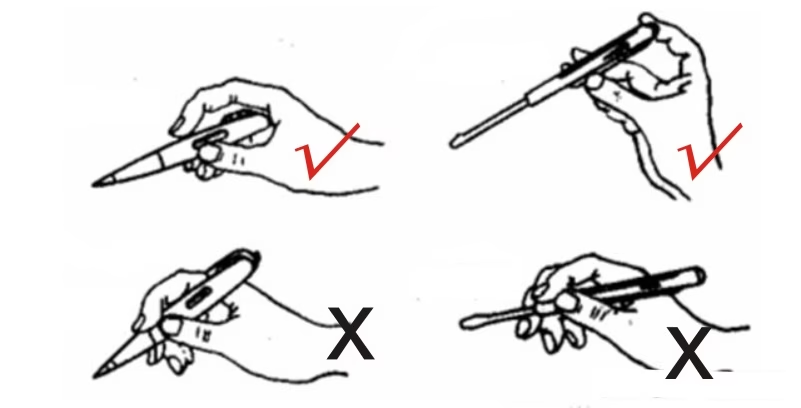
Appendix Figure C-2 Low-Voltage Neon Bulb Tester Usage Metho
Before use, you must test the low-voltage neon bulb tester on a live conductor to check if it lights up normally. In bright light, the glow of the neon bulb may be difficult to see, so you should avoid bright light. Only after confirming that the tester is functioning properly can you use it.
When testing, you should gradually move the low-voltage neon bulb tester closer to the object to be tested until the neon tube lights up. Do not directly touch the object to be tested.
When testing, your finger must touch the metal body at the end of the tester; otherwise, a live body may be mistakenly judged as non-live.
When testing, prevent your fingers from touching the metal part of the tip to avoid electric shock.
Inductive Digital Display Tester The inductive digital display tester is shown in Appendix Figure C-3. It is suitable for direct detection of 12-250V AC/DC voltage and indirect detection of the neutral wire, live wire, and break points of AC power. It can also be used to measure the continuity of non-live conductors.
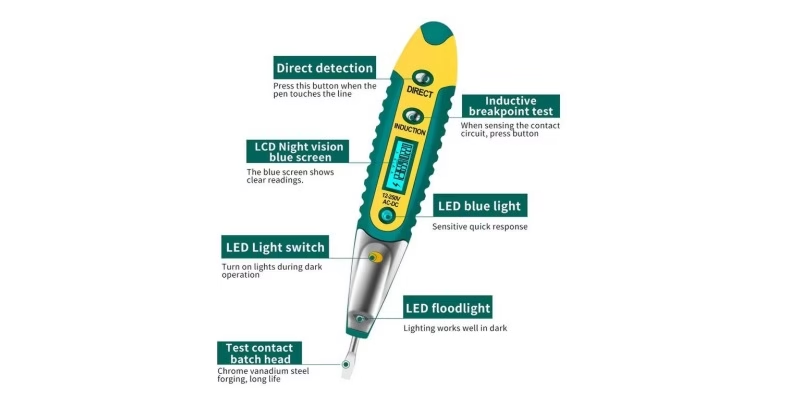
Appendix Figure C-3 Inductive Digital Display Tester
Screwdriver Operation Skills
Screwdriver Classification A screwdriver is a tool used to turn screws to make them secure. It usually has a thin, wedge-shaped head that fits into the slot or notch of a screw head. Common screwdrivers (also known as screwdrivers) are shown in Appendix Figure C-4 and are generally divided into two types: flathead and Phillips.

Appendix Figure C-4 Screwdriver (a) Flathead screwdriver; (b) Phillips screwdriver
Screwdriver Usage Precautions When using a screwdriver, you should pay attention to the following:
- (1) When using it, do not use the screwdriver as a pry bar or chisel.
- (2) Before use, you should wipe the oil off the handle and blade end to prevent it from slipping during work, which could cause an accident. It should also be wiped clean after use.
- (3) The correct method is to hold the screwdriver with your right hand, with the palm against the end of the handle, so that the tip of the screwdriver is vertically aligned with the slot of the screw.
- (4) When loosening a screw, apply pressure to the screwdriver and then twist it with your wrist. Once the screw is loose, you can lightly press the screwdriver handle with your palm and quickly turn the screwdriver with your thumb, middle, and index fingers.
- (5) The selected screwdriver tip should fit the slot on the screw. If the tip is too thin, it is easy to break. If it is too thick, it cannot be fully inserted into the slot, which can damage the tip or the screw slot.
The following should also be noted when using a screwdriver: (1) For larger screwdrivers, in addition to clamping the handle with your thumb, index, and middle fingers, your palm should also rest against the end of the handle to prevent it from slipping when rotating. (2) For smaller screwdrivers, clamp the handle with your thumb and middle finger while pushing the end of the handle with your index finger to turn it. (3) For longer screwdrivers, press and turn the handle with your right hand, while your left hand holds the middle part of the screwdriver (do not place it near the screw to avoid cutting your hand), to prevent the screwdriver from slipping. (4) When working with live circuits, your hand must not touch the metal rod of the screwdriver (you should not use screwdrivers with a metal rod that goes straight through to the top of the handle) to avoid electric shock accidents. To prevent the metal rod from touching the human body or adjacent live bodies, the metal rod should be covered with an insulating tube.
Electrician’s Pliers Operation Skills
Steel Pliers Steel pliers are a tool for gripping or bending thin metal sheets and cutting metal wires. Electricians’ steel pliers have an insulating sleeve on the handle (rated for 500V). Their specifications are indicated by the total length in millimeters, with common sizes being 150, 175, and 200mm. The structure and application of steel pliers are shown in Appendix Figure C-5. When using steel pliers, pay attention to the following: (1) Before use, you should check if the insulation of the steel pliers is in good condition, to avoid electric shock accidents during live work. (2) When cutting live wires, you must not use the cutting edge to simultaneously cut two wires with different potentials (such as a live wire and a neutral wire, or two live wires), to avoid short-circuit accidents.
Appendix Figure C-5 Steel Pliers Structure and Application (a) Structure; (b) Bending wire; (c) Tightening nuts; (d) Cutting wires; (e) Shearing steel wire
Needle-Nose Pliers Needle-nose pliers have a pointed head, as shown in Appendix Figure C-6. Their use is similar to steel pliers, but they are particularly suitable for operating in small spaces and can grip smaller screws, washers, wires, and electrical components. When installing control circuits, needle-nose pliers can be used to bend single-strand wires into terminals. Needle-nose pliers with a cutting edge can also be used to cut small-section wires and strip insulation. If using needle-nose pliers for live work, you should check if the insulation is in good condition, and the metal parts should not touch the human body or adjacent live bodies during operation.
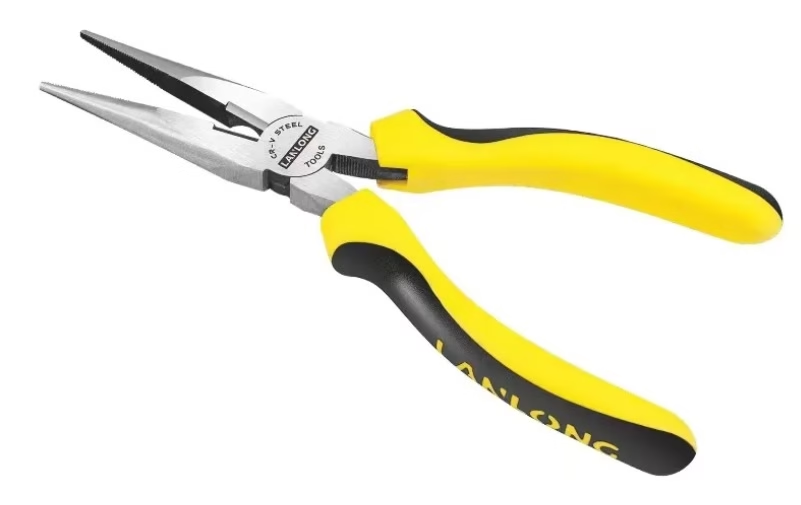
Appendix Figure C-6 Needle-Nose Pliers
Diagonal Cutting Pliers
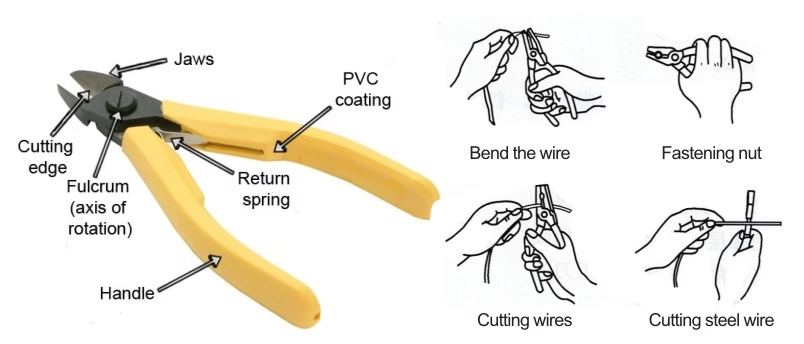
Diagonal cutting pliers have a “flat, slanted” head, also known as flush cutters, as shown in Appendix Figure C-7. They can be used to cut thicker metal wires, wires, and cable cores. You should select the appropriate size of diagonal cutting pliers for materials of different thicknesses and hardness.
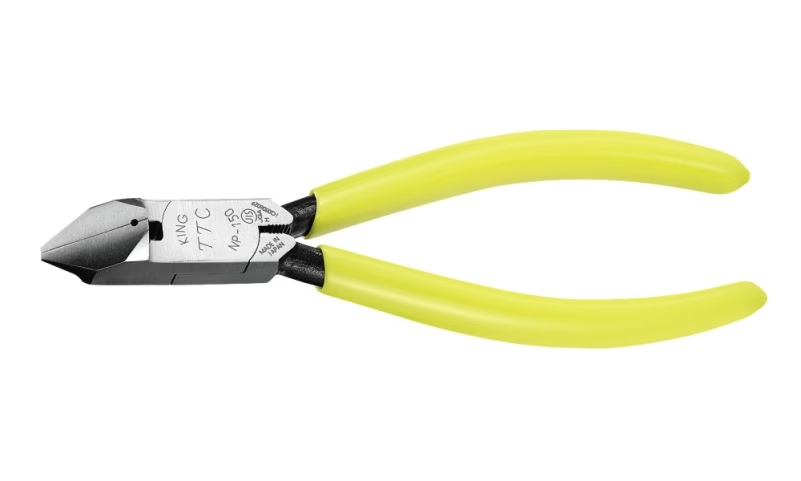
Appendix Figure C-7 Diagonal Cutting Pliers
Wire Strippers
Wire strippers are a tool specifically for stripping insulation from fine wires, and their shape is shown in Appendix Figure C-8. The jaws of the wire strippers have several cutting edges to strip insulation from wires of different diameters. The handle is insulated and rated for 500V.

Appendix Figure C-8 Wire Strippers
Electrician’s Knife Operation Skills
Electrician’s Knife Composition The electrician’s knife is a common cutting tool for electricians, as shown in Appendix Figure C-9.

Appendix Figure C-9 Electrician’s Knife
Electrician’s Knife Usage and Precautions The following should be noted when using an electrician’s knife:
(1) Because the electrician’s knife handle has no insulation protection, it must never be used on live wires or electrical equipment to avoid electric shock.
(2) You should cut with the blade facing outwards and be careful to avoid injuring your fingers.
(3) When stripping wire insulation, the blade should form a small acute angle with the wire to avoid cutting the wire core.
(4) When finished, immediately fold the blade into the handle.
Soldering Iron Operation Skills
Soldering Iron Classification and Structure The soldering iron structure is shown in Appendix Figure C-10.
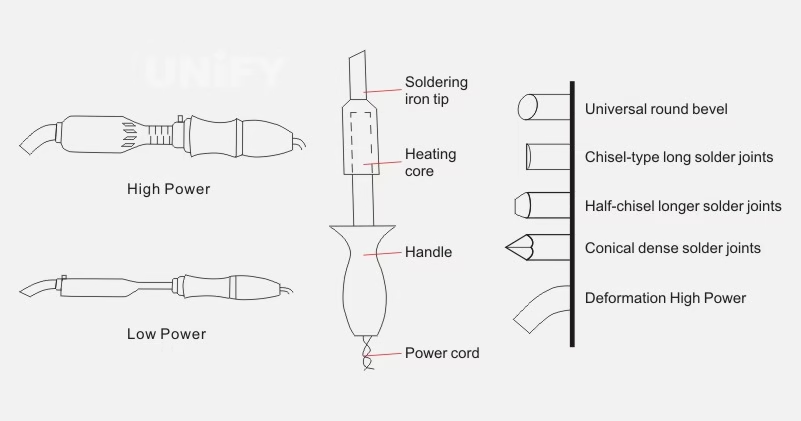
Appendix Figure C-10 Soldering Iron Structure
Soldering Iron Selection There are many types and specifications of soldering irons, and the size of the workpiece to be soldered also varies. Therefore, the proper selection of soldering iron power and type is directly related to improving welding quality and efficiency.
Soldering Iron Usage and Precautions There are two common ways to hold a soldering iron: the pen grip and the fist grip, as shown in Appendix Figure C-11.
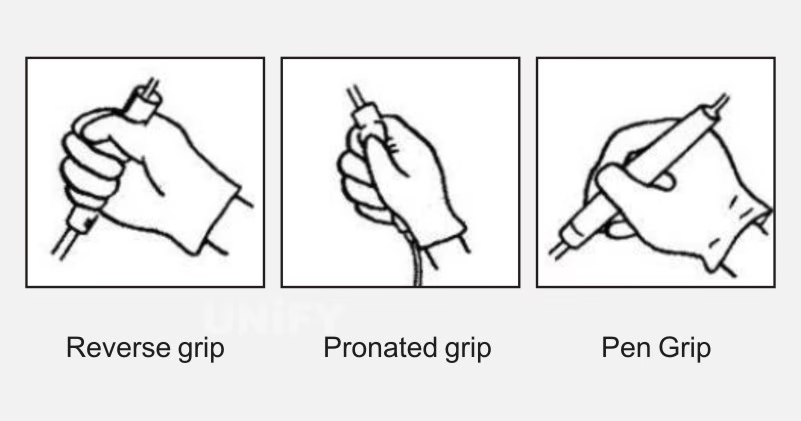
Appendix Figure C-11 Soldering Iron Holding Methods (a) Pen grip; (b) Fist grip
The following should be noted when using a soldering iron:
- (1) Before use, you should check if the power cord is in good condition and has not been burned.
- (2) When soldering electronic components (especially integrated circuits), you should take safety measures such as anti-leakage.
- (3) When the soldering tip is oxidized and does not “take solder”, do not force it to burn.
- (4) When there is too much solder on the soldering tip for easy soldering, do not flick or tap it off; you can wipe it off with a cloth.
- (5) Do not solder small components for too long to avoid thermal damage to the components or insulation. If necessary, you can use tweezers to hold the pins to help dissipate heat.
- (6) After soldering, use alcohol to clean the residual flux from the circuit board to prevent carbonized flux from affecting the normal operation of the circuit.
- (7) Integrated circuits should be soldered last. The soldering iron should be reliably grounded, or you can unplug the power and use the residual heat to solder.
- (8) After soldering is complete, you should unplug the power cord and place the soldering iron on a metal stand to prevent burns or fires.
Digital Multimeter Operation and Precautions
The DT830 is a 3 1/2-digit digital multimeter, and its panel diagram is shown in Appendix Figure C-12.
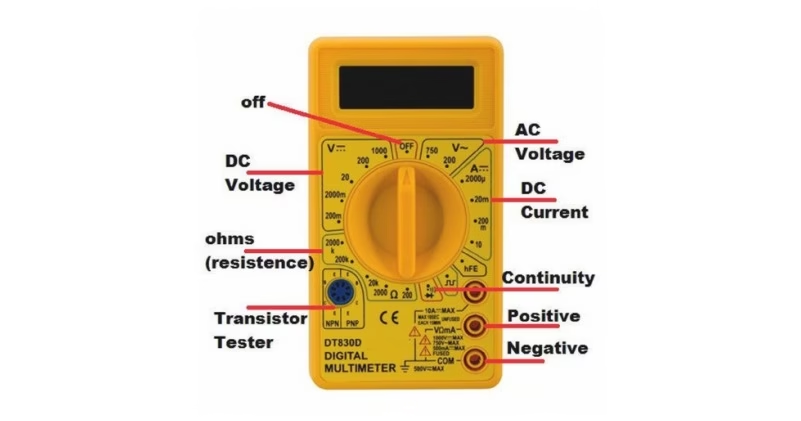
Appendix Figure C-12 DT830 Digital Multimeter Panel Diagram
Precautions
- (1) When measuring voltage, the digital multimeter should be connected in parallel with the circuit under test. The digital multimeter has an automatic polarity conversion function, so you do not need to consider the positive and negative polarity when measuring DC voltage. However, if you mistakenly use the AC voltage range to measure DC voltage, or use the DC voltage range to measure AC voltage, it will display “000”.
- (2) It is strictly forbidden to measure resistance on a live circuit, and you are also not allowed to measure the internal resistance of a battery. When checking electrolytic capacitors on electrical equipment, you should turn off the power and short-circuit the positive and negative terminals of the capacitor to prevent the stored charge on the capacitor from discharging through the multimeter and damaging the meter.
- (3) It is strictly forbidden to rotate the range switch when measuring high voltage (above 220V) or high current (above 0.5A) to prevent arcing and burning of the switch contacts.
- (4) The meter should be used and stored away from high temperatures, cold, direct sunlight, high humidity, and strong vibration environments. After measurement, the range switch should be set to the highest voltage range, and the power should be turned off. If the meter is not used for a long time, the battery should be removed to prevent battery leakage.
Impact Drill Safety Operation Skills
Impact Drill Characteristics An impact drill has a double insulation design for safe and reliable operation. A hand-held impact drill is shown in Appendix Figure C-13.

Appendix Figure C-13 Hand-held Impact Drill
Correct Impact Drill Usage Method
(1) Before operation, you must check if the power supply matches the rated voltage of the impact drill, to avoid incorrect connection.
(2) Before using the impact drill, you should carefully check the body’s insulation protection, auxiliary handle, and depth gauge adjustment, and check for any loose screws.
(3) It is strictly forbidden to use drill bits beyond the specified range. When drilling, you should be careful to avoid steel bars in the concrete; apply moderate force to the drill bit, avoiding shaking; if the speed drops sharply, you should reduce the force to prevent the motor from overloading, and it is strictly forbidden to apply pressure with a wooden stick.
(4) The impact drill’s power cord must be protected. It is strictly forbidden to drag it on the ground where it can be crushed or cut, and it should never be dragged into oil or water.
(5) The power outlet used for the impact drill must be equipped with a leakage switch, and you should check the power cord for any damage.
(6) When changing the impact drill bit, you should unplug the power cord. Use the special wrench and drill bit key to tighten it. Do not use non-specialized tools to tap the impact drill.
(7) When using an impact drill, remember not to apply excessive force or operate it at a skewed angle, and do not use an oversized drill bit.
Impact Drill Safety Operation Rules
- (1) When using an impact drill, you must wear protective glasses. During work, you must be fully focused.
- (2) Check if the impact drill switch is sensitive and reliable.
- (3) Check if the impact drill’s insulation is intact.
- (4) When clamping the drill bit, use appropriate force. Before use, the drill should be idled for a few minutes.
- (5) When drilling, you should allow the drill bit to slowly contact the workpiece. Do not apply excessive force to avoid breaking the drill bit or damaging the motor. When drilling, you must hold the drill bit perpendicular to the workpiece and must not shake the impact drill.
- (6) Use both hands to hold the impact drill (with the auxiliary handle).
- (7) It is strictly forbidden to wear gloves when using an impact drill to prevent the drill bit from getting tangled. When using the impact drill in a damp area, you must stand on a rubber mat or a dry wooden board to prevent electric shock.
- (8) If you discover that the impact drill is leaking electricity, vibrating, or overheating, you should immediately stop using it.
- (9) Do not remove or change the drill bit until the impact drill has completely stopped rotating. If an abnormality occurs, no one else should disassemble or assemble it; it should be handed over to a professional for timely repair.
- (10) If you need to apply pressure to the impact drill, the impact drill must be vertical, and the fixed end must be secure.
- (11) When changing to a new drill bit mid-way and drilling into the original hole, do not apply sudden force to prevent the drill bit from breaking.
- (12) When using the impact drill at heights or in explosion-proof or other dangerous areas, you must take safety protection measures.
- (13) When there is a power outage, during a break, or when leaving the work area, you should immediately cut off the power.
- (14) When the work is complete, the impact drill should not be left randomly; it should be stored in the designated place.
Impact Drill Usage Precautions
- (1) Personnel operating the impact drill should wear appropriate work clothes, not clothes that are too loose. Do not wear jewelry or have long hair, and it is strictly forbidden to wear gloves with unbuttoned cuffs when operating the impact drill.
- (2) An impact drill should not be used as an electric drill in most cases. Even if it has a conversion switch, it is best not to use it for drilling.
- (3) The impact drill has a 40% intermittent duty cycle and should not be used continuously for a long time. (4) For holes with a diameter of more than 25mm, there should be a stable working platform with guardrails around it.
Hand-held Electric Drill Safety Operation Skills
Hand-held Electric Drill Characteristics The hand-held electric drill schematic is shown in Appendix Figure C-14.

Appendix Figure C-14 Hand-held Electric Drill Schematic
Hand-held Electric Drill Usage Precautions
(1) Do not use the hand-held electric drill to drill holes in cement and brick walls, as it can easily cause the motor to overload and burn out.
(2) The power cord of the hand-held electric drill should not be soaked in water, dragged, or trampled on, nor should it touch heat sources or corrosive media.
(3) The power cord for the hand-held electric drill must be a rubber cable; it should not be a plastic wire.
(4) Before operation, you should confirm that the hand-held electric drill’s switch is in the off state to prevent the drill from suddenly rotating when the plug is inserted into the power outlet.
(5) Before use, carefully check if the power cord and plug are intact. For hand-held electric drills with a metal casing, you must take protective grounding (or neutral connection) measures. After connecting to power, use a test pencil to check if the casing is live.
(6) Before use, the hand-held electric drill should be idled for 0.5-1 minute to check if the transmission part is flexible, if there is any abnormal noise, if screws are loose, and if the commutator sparks are normal.
(7) When in use, do not wrap the power cord around your arm to prevent electric shock in case the power cord is damaged or leaks electricity. (8) Do not apply excessive force when drilling. When the speed drops abnormally, you should relax the pressure to avoid damaging the motor due to overload.
(9) When drilling holes in walls, floors, or ceilings, you should first have a thorough understanding of what is inside, to see if there are buried cables, pipes, or metal embedded parts, to avoid damage.
(10) When not in use, the power plug should be unplugged in a timely manner. The hand-held electric drill should be stored in a dry, clean environment.
(11) When using the electric drill, pay attention to the size of the brush sparks. If the sparks are too large and the drill overheats, you must stop using it and check it.
Hand-held Electric Drill Safety Operation Rules
- (1) When using an electric drill that belongs to Class I hand-held power tools, it should be equipped with a leakage protector and insulating rubber gloves or an isolation transformer.
- (2) When drilling holes of different diameters with a hand-held electric drill, you should select the corresponding size of drill bit. The drill bit must be sharp, and the force should be moderate, not too strong. When changing the drill bit, you should turn off the power and unplug the power cord. If the hand-held electric drill fails, you should find a professional for repair and not disassemble or assemble it yourself.
- (3) The hand-held electric drill’s casing should have a neutral or ground protection measure. After plugging in the power plug, you should first use a test pencil to check that the casing is not live before use.
- (4) The power supply used must comply with the hand-held electric drill’s nameplate specifications. Before connecting to the power supply, you must check that the switch is turned off, and there should be no splices in the electrical lines. The power cord is strictly forbidden to be placed randomly or dragged.
- (5) Do not remove or change the drill bit until the hand-held electric drill has completely stopped rotating. When not in use, before maintenance, or when changing accessories, you must unplug the power cord. When there is a power outage, during a break, or when leaving the work area, you should immediately cut off the power.
- (6) When you need to apply pressure to the hand-held electric drill while drilling, the drill must be vertical to the workpiece, and the fixed end must be very secure.
- (7) Do not wear gloves made of cotton yarn, plush, or similar materials for operation. When the work is complete, the hand-held electric drill should be placed in the designated place.
- (8) When drilling with a hand-held electric drill, do not touch the drill bit during the drilling process or immediately after the drilling is complete.
- (9) Hand-held electric drills should not be used in environments with flammable or explosive gases.
- (10) Do not move the electric drill by dragging the cable, and do not forcibly pull the cable to remove the plug from the power outlet.
9. Nail Gun Safety Operation Skills
The nail gun’s appearance and principle are similar to a handgun, as shown in Appendix Figure C-15.
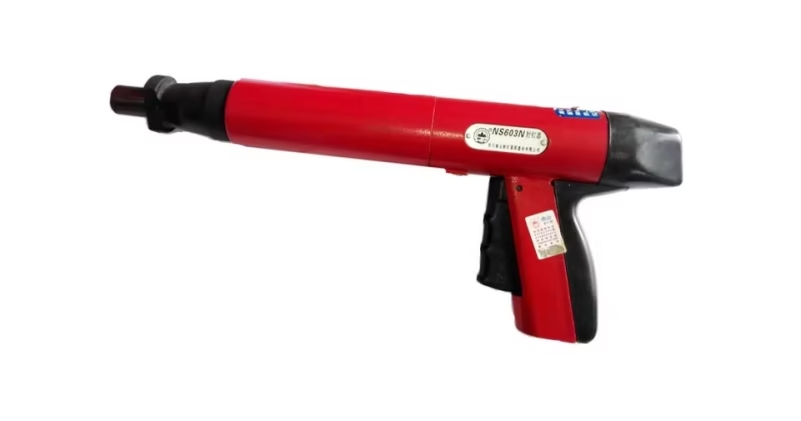
Appendix Figure C-15 Nail Gun
Nail Gun Operation Requirement
(1) Operators must be trained, and understand and master the performance, function, structural characteristics, usage, and precautions of the nail gun. They must also be familiar with the disassembly and assembly procedures. When operating a nail gun, you must firmly follow the “one person operates, one person supervises” work system. The supervisor must be personally designated by the construction manager.
(2) Before operation, you must conduct a comprehensive inspection of the nail gun.
(3) When loading, the moving parts should be flexible, the barrel should be clear of obstructions, and all screws should be tightened.
(4) When loading a bullet, hold the handle with one hand and the coordinate guard with the other, with the barrel pointing downwards.
(5) Shooting operation. When operating a nail gun, the operator must firmly grip the nail gun handle and be highly focused to prevent injury to the operator and nearby workers. When firing, you should press the nail gun vertically and tightly against the working surface. If the bullet does not fire after pulling the trigger twice, you should hold the original shooting position for a few seconds before ejecting the bullet.
(6) The nail gun should be wiped immediately after use and a small amount of oil should be applied.
(7) After a week of use, the nail gun needs to be disassembled, wiped clean, and oiled to maintain good performance and extend its service life.
Nail Gun Operation Precautions
- (1) It is not recommended to use a nail gun on soft substrates, such as wood or loose soil.
- (2) It is strictly forbidden to work in flammable and explosive areas, and never work on fragile or hard objects such as marble, granite, cast iron, or tempered steel. It is strictly forbidden to shoot if there are people behind the work surface.
- (3) After loading the nail bullet, it is strictly forbidden to press the barrel directly with your hand, and do not point a loaded nail gun at others.
- (4) If the nail bullet does not fire during the shooting process, you should hold it still for more than 5 seconds before moving the nail gun.
- (5) After using the nail gun, you should wipe or clean the components in a timely manner. Before maintenance, the nail bullet should be removed.
- (6) If the nail gun is found to be operating inflexibly, you must promptly remove the nail and bullet and troubleshoot the problem; do not tap it arbitrarily. If a loaded nail gun is not in use, do not easily disengage the safety.
- (7) If an abnormality is found during work, you should immediately stop using it and conduct a comprehensive inspection.
- (8) The nail gun and its accessories (bullets, nails) must be stored separately and handled by a dedicated person.
Recommend Products

P4.81 Rental LED Display Waterproofing: IP65 Protection & Maintenance Guide | UnifyLED
Complete P4.81 rental LED display waterproofing guide: IP65 vs IP54 vs IP67, full glue potting process, EPDM gasket maintenance schedule, waterproof connector types, spray test protocol, and emergency rain protection for outdoor rental events.
P4.81 LED Module Hot Swap Guide: Replace Modules Without Downtime (2026) | UnifyLED
Step-by-step P4.81 LED module hot swap guide: magnetic latch release, JST VH connector handling, 5-step procedure (60 seconds), front vs rear access, post-swap calibration, and when to power down vs hot swap. For rental techs and outdoor billboard operators.

P3.91 LED Display Rental vs Fixed: Complete B2B Decision Guide (2026) | UnifyLED
P3.91 LED display rental vs fixed comparison: cabinet architecture, 5-year TCO analysis ($112K vs $64K), decision matrix, hybrid ownership model. Data-driven guidance for AV integrators, event companies, and venue operators.